Table of Contents
**This is an old revision of the document!**
Getting Started with AWS Cloud
![]()
Why AWS (Amazon Web Services)?
AWS customers are using the File Fabric to take advantage of the high durability, scalability and low cost of Amazon S3. Customers are able to securely extend access to end users and existing file-based applications, significantly reducing migration costs to the cloud.
For more information on See The Enterprise File Fabric™ — The Killer Solution for Object Storage !
Architecture

Single VM Deployment
For evaluation and smaller production environments the Enterprise File Fabric™ solution is typically deployed as a single virtual machine. The virtual machine includes an embedded database and search index.
A single virtual machine can be launched directly from the AWS Marketplace.
Multiple VM Deployment

The Enterprise File Fabric solution may also be deployed for High Availability with multiple virtual machines and a separate database.
Please contact us for more information on setting up HA deployments on the AWS Cloud.
For production deployments see also Architecture and Sizing Guide.
Requirements
You will need the following information before you can complete setup on the AWS:
- A domain name (recommended)
- License key (required) - A trial key can be requested from https://www.storagemadeeasy.com/appform/.
- Outbound mail relay information. (recommended)
- Default storage system connectivity details - for example, Amazon S3 (required)
- An Active Directory service account if you are connecting to AD (optional)
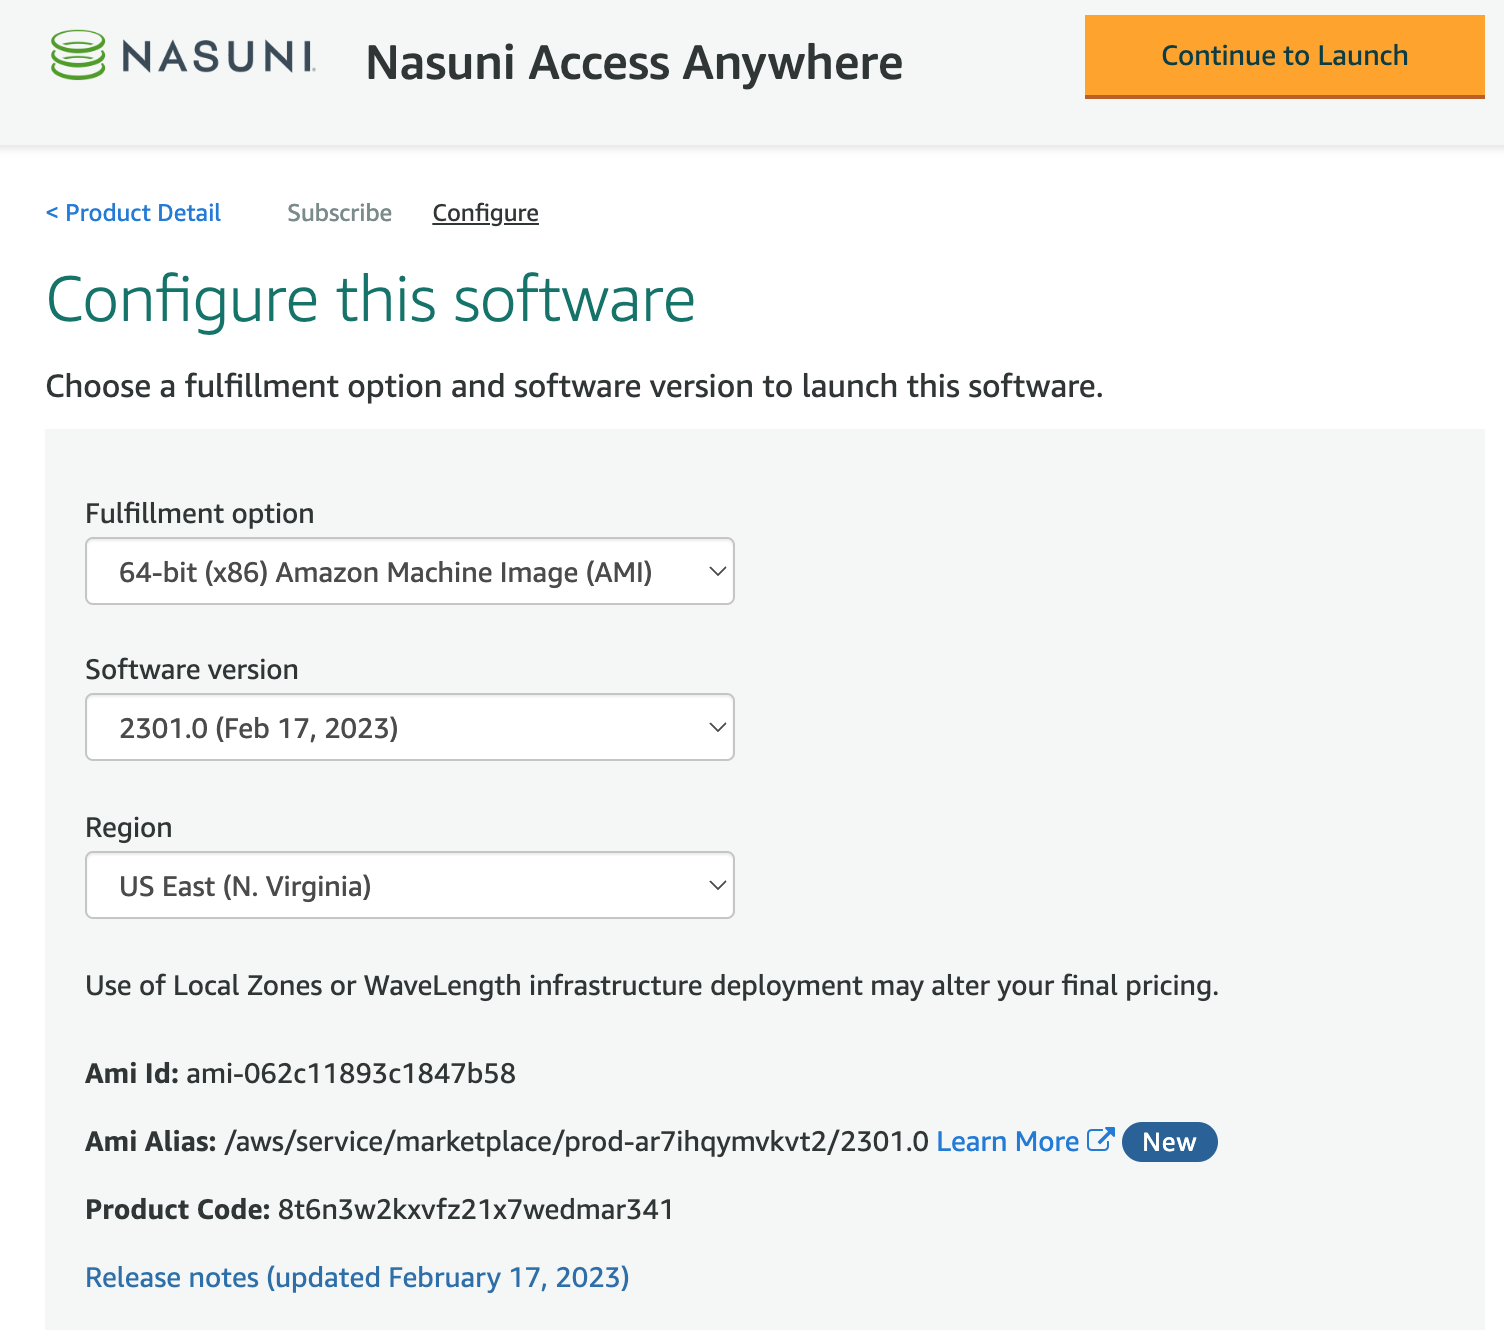
Launch from AWS Marketplace
From the AWS Marketplace page select “Continue to Subscribe”.

Review terms and select “Continue to Configuration”.

Select your preferred Region and then select “Continue to Launch”
This page allows you to launch the instance directly from this webpage, or through the EC2 launch instance wizard.
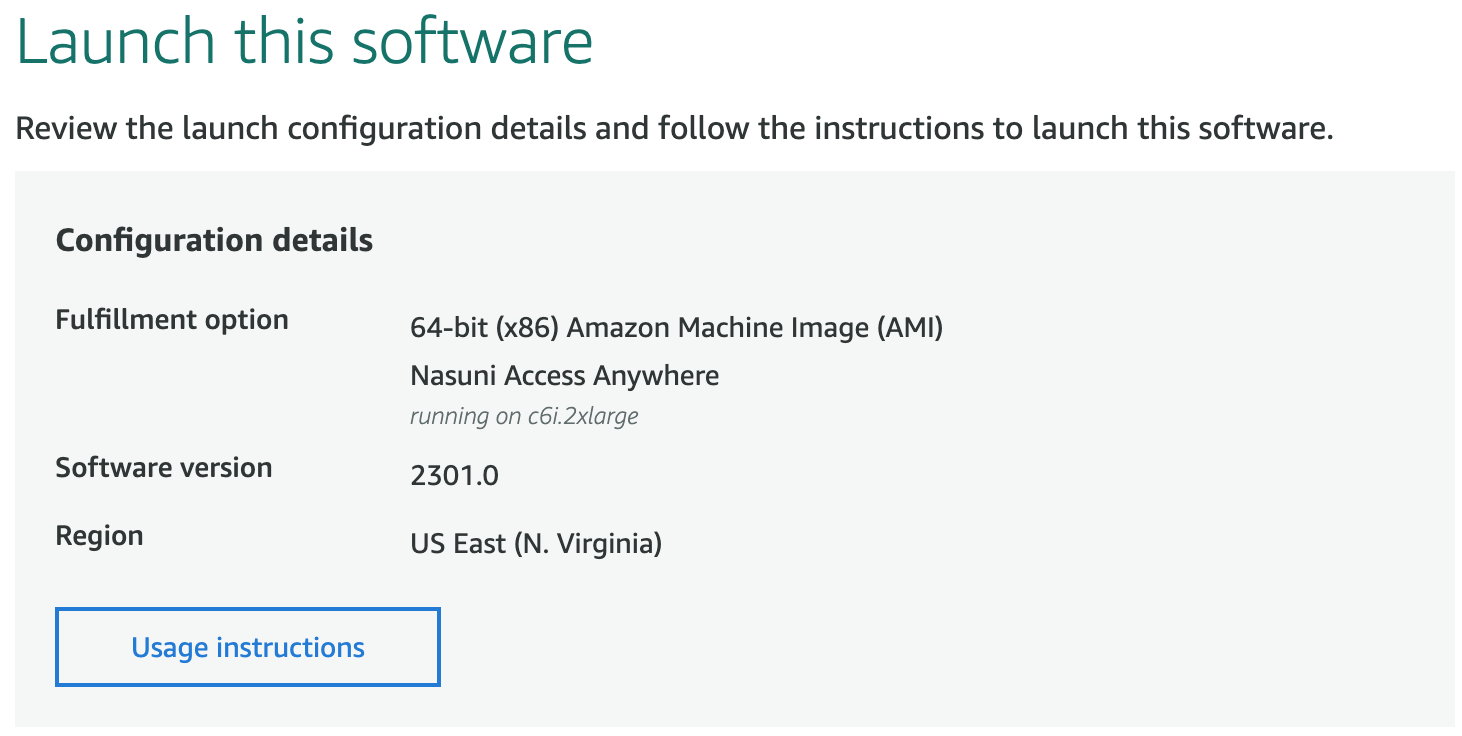
Leave the setting as Launch from Website (Recommended). Instructions for launching from EC2 instead are provided in the section Launch Through EC2.

Launch from Website (Recommended)
Review defaults:
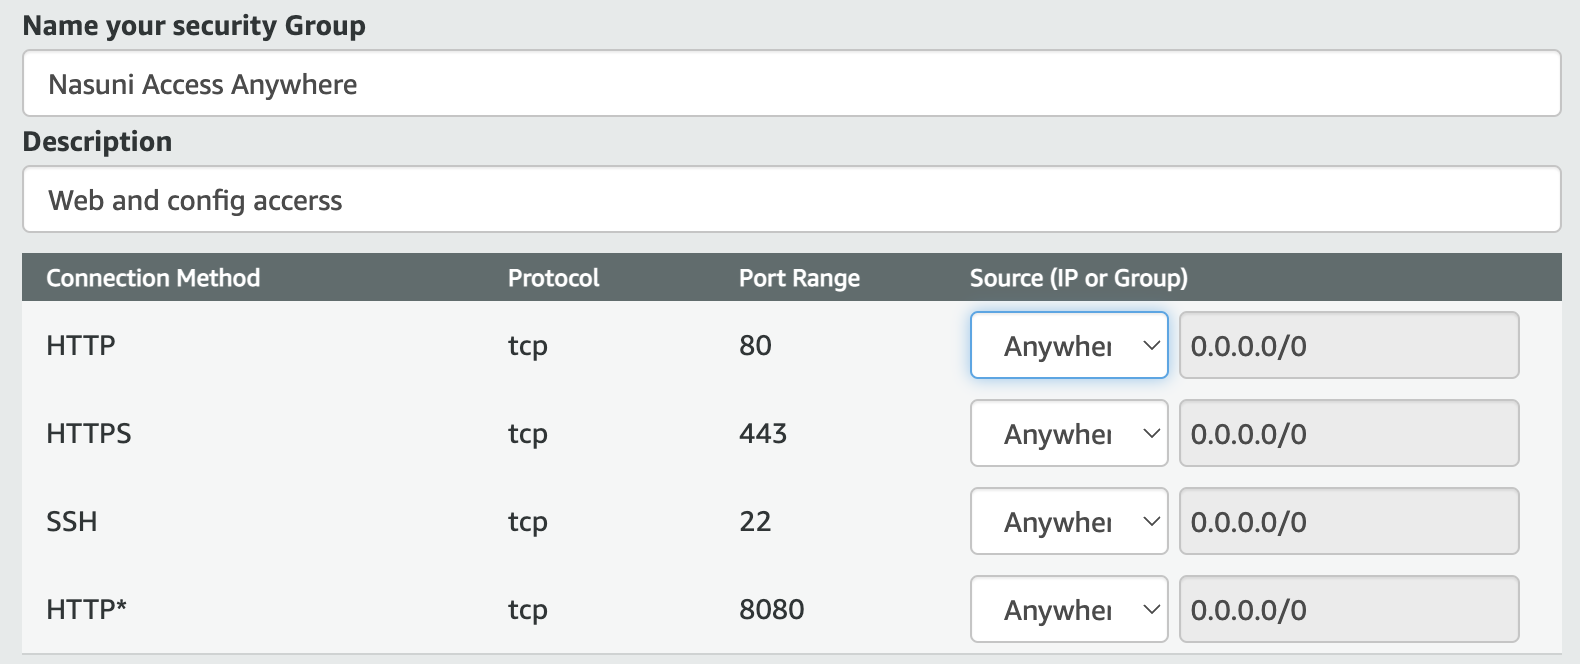
Security Group Settings
Select “Create New Based on Seller Settings”.
Create New Security Group
Add a name and description.
Do NOT change the Source (IP or Group) to “My IP” as this setting incorrectly assigns an internal AWS IP address.
Select “Save”.
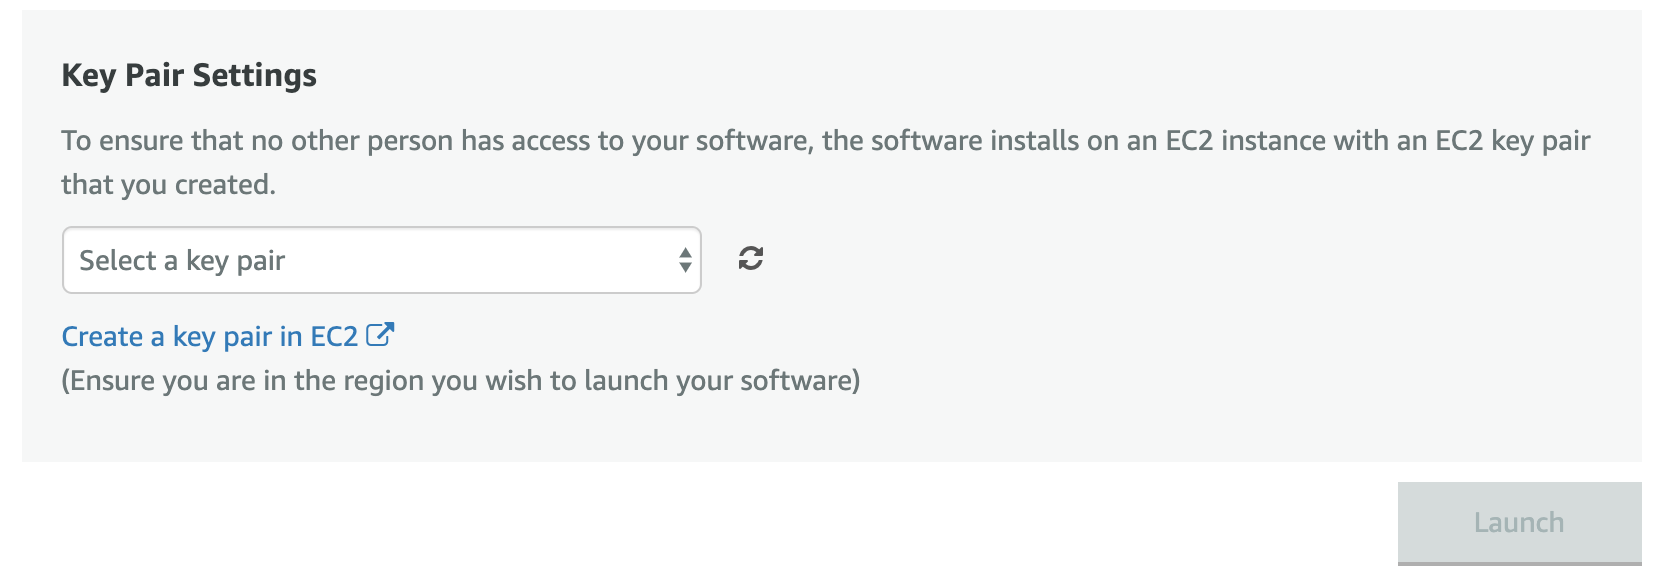
Key Pair
Amazon EC2 uses SSH-2 RSA keys for SSH which is required to complete configuration. A public/private key pair can be assigned or created.
Choose an existing Key Pair or create a new one.
Launch
Select the “Launch” button to deploy.
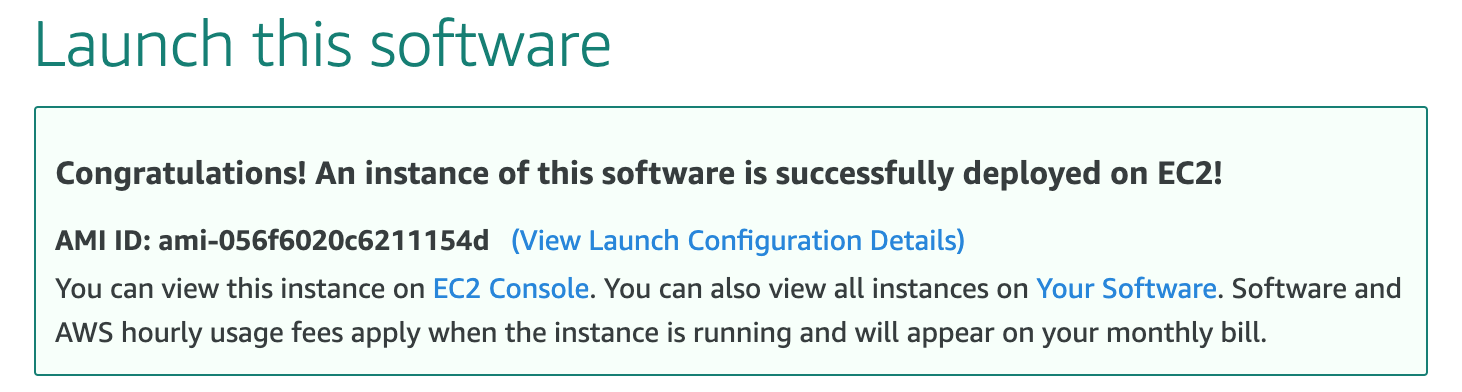
Select EC2 Console to see the instance running in the region you selected.
Add a Name by clicking in the empty Name box and entering “Enterprise File Fabric”.
Jump to the next step Add Static IP Address.
Launch through EC2
If you did not “Launch from the website”, follow these steps to launch the instance.
Step 1. Choose an Amazon Machine Image (AMI)
- From the AWS Marketplace click Enterprise File Fabric.
- Then click Launch.
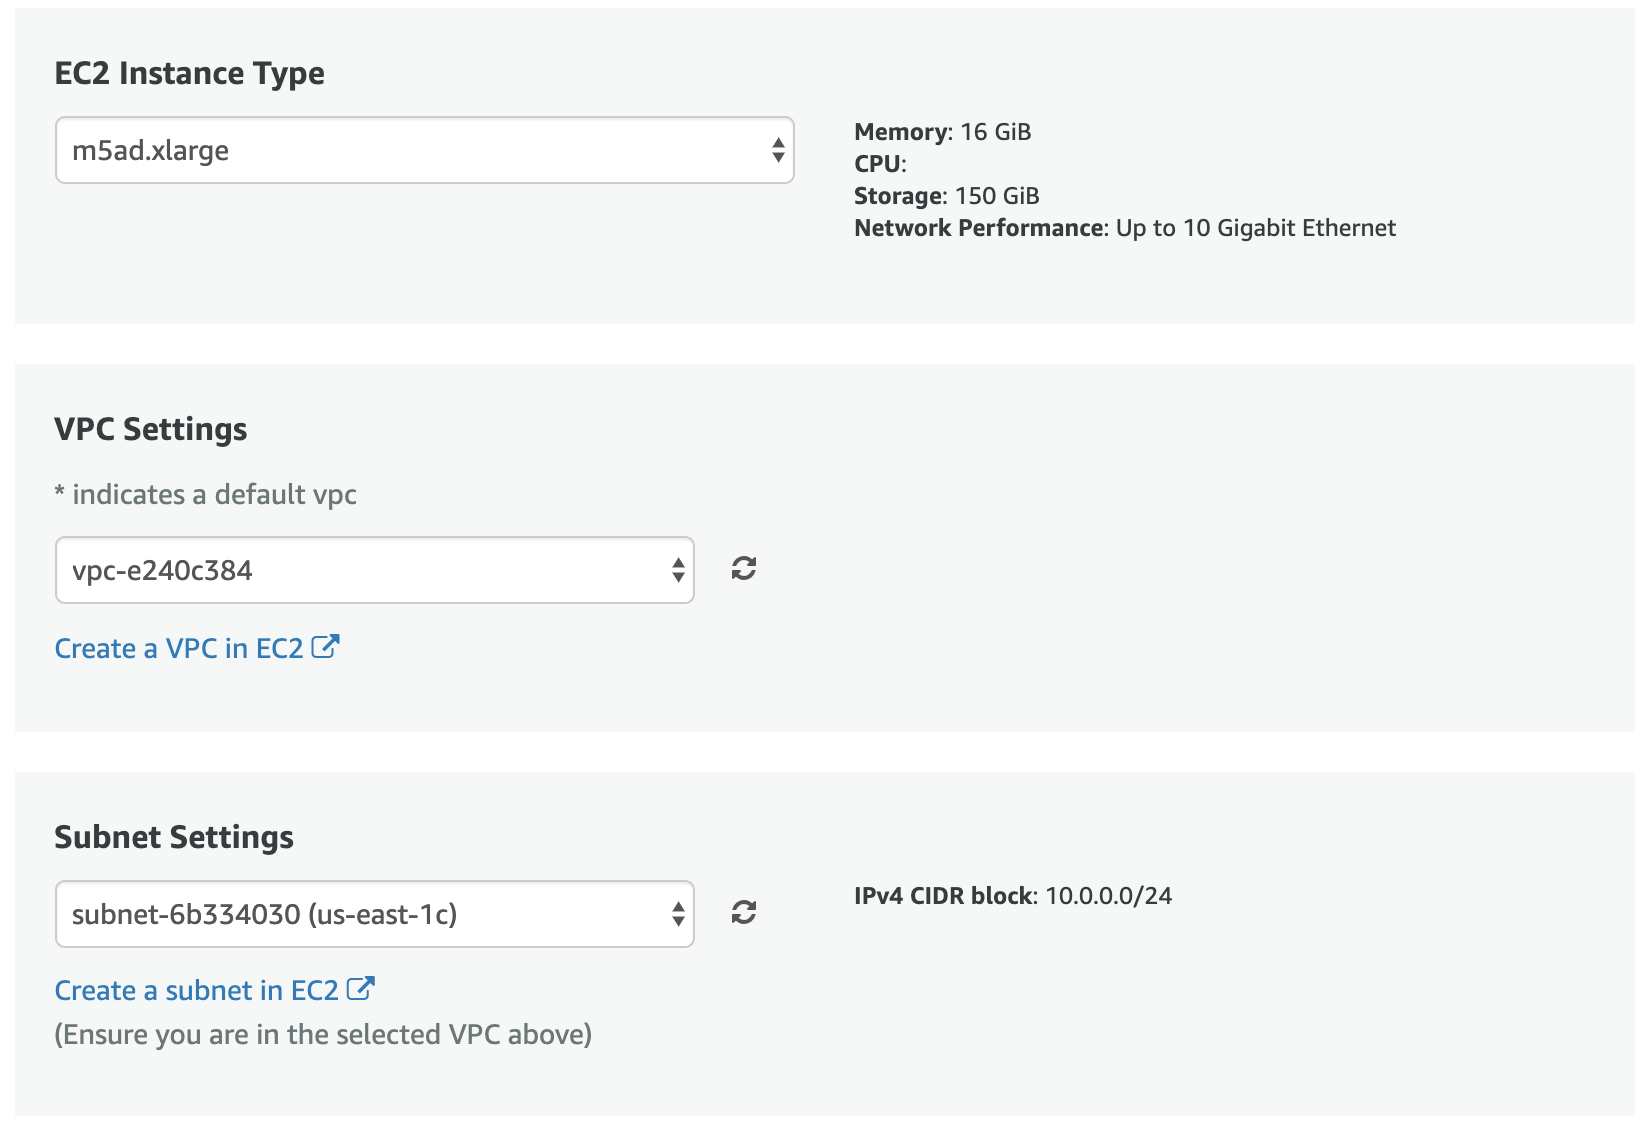
Step 2: Choose an Instance Type
Minimum recommended settings are:
- 4 vCPUs
- 16 GiB memory
- 150 GB Storage (SSD)
For example,
| Type | vCPUs | Memory (GiB) | Instance Storage (GB) | Description |
|---|---|---|---|---|
| m5ad.xlarge | 4 | 16 | 1 x 150 (SSD) | Minimum recommended |
Step 3: Configure Instance Details
Check the following setting:
- Auto-assign Public IP - set to Enable
Step 4: Add Storage
Accept the defaults, for example:
| Volume Type | Device | Snapshot | Size (GbB) | Volume Type | Delete on Termination |
|---|---|---|---|---|---|
| Root | /dev/sda1 | snap-05dd6ab8b681d39e7 | 100 | [General Purpose SSD (gp2] | Yes |
| ephemeral0 | /dev/nvme0n1 | N/A | 150 | NVMe SSD | N/A |
You might wish to change “Delete on Termination” to False to prevent your instance from being accidentally terminated through Amazon EC2.
Step 5: Add Tags
No changes, select Next: Configure Security Group
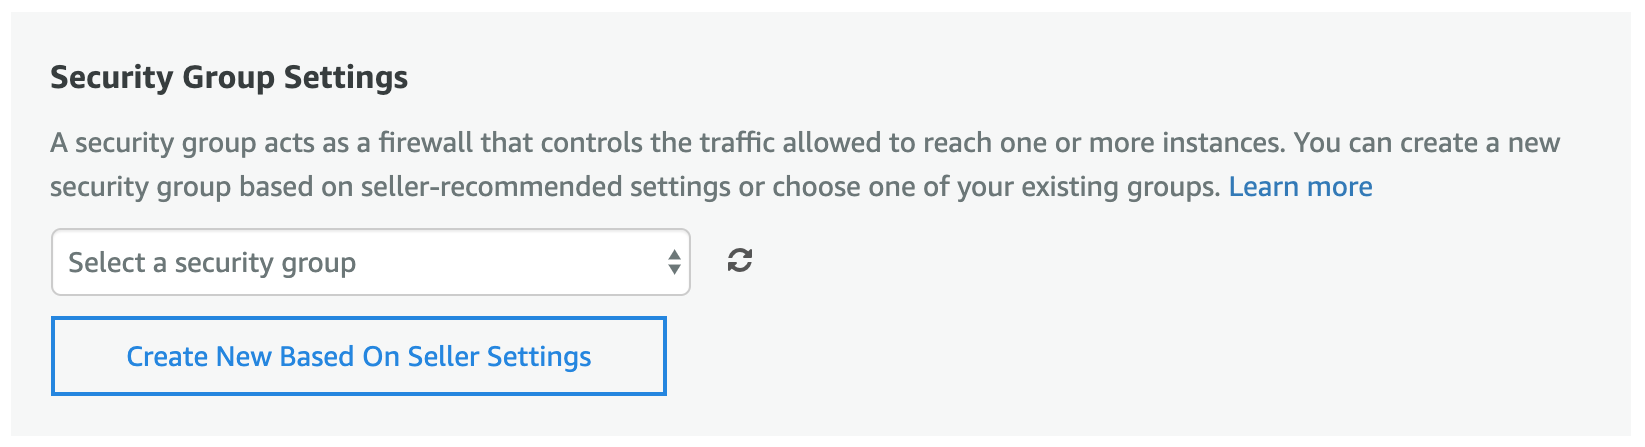
Step 6: Configure Security Group
Create a new security group for the “File Fabric” with three settings:
| Type | Protocol | Port Range | Source | Description |
|---|---|---|---|---|
| SSH | TCP | 22 | My IP | SSH for initial configuration |
| Custom TCP Rule | TCP | 8080 | My IP | Installation website (temporary) |
| HTTPS | TCP | 443 | Anywhere | Main website |
| HTTP | TCP | 80 | Anywhere | Redirects to main website |
If you will be access the File Fabric using FTP/FTPS or SFTP you'll need to add additional ports.
Step 7: Review Instance Launch
Select [Launch] to bring up the dialog to choose or create a public/private key pair. This will allow you to ssh into the instance and complete setup.
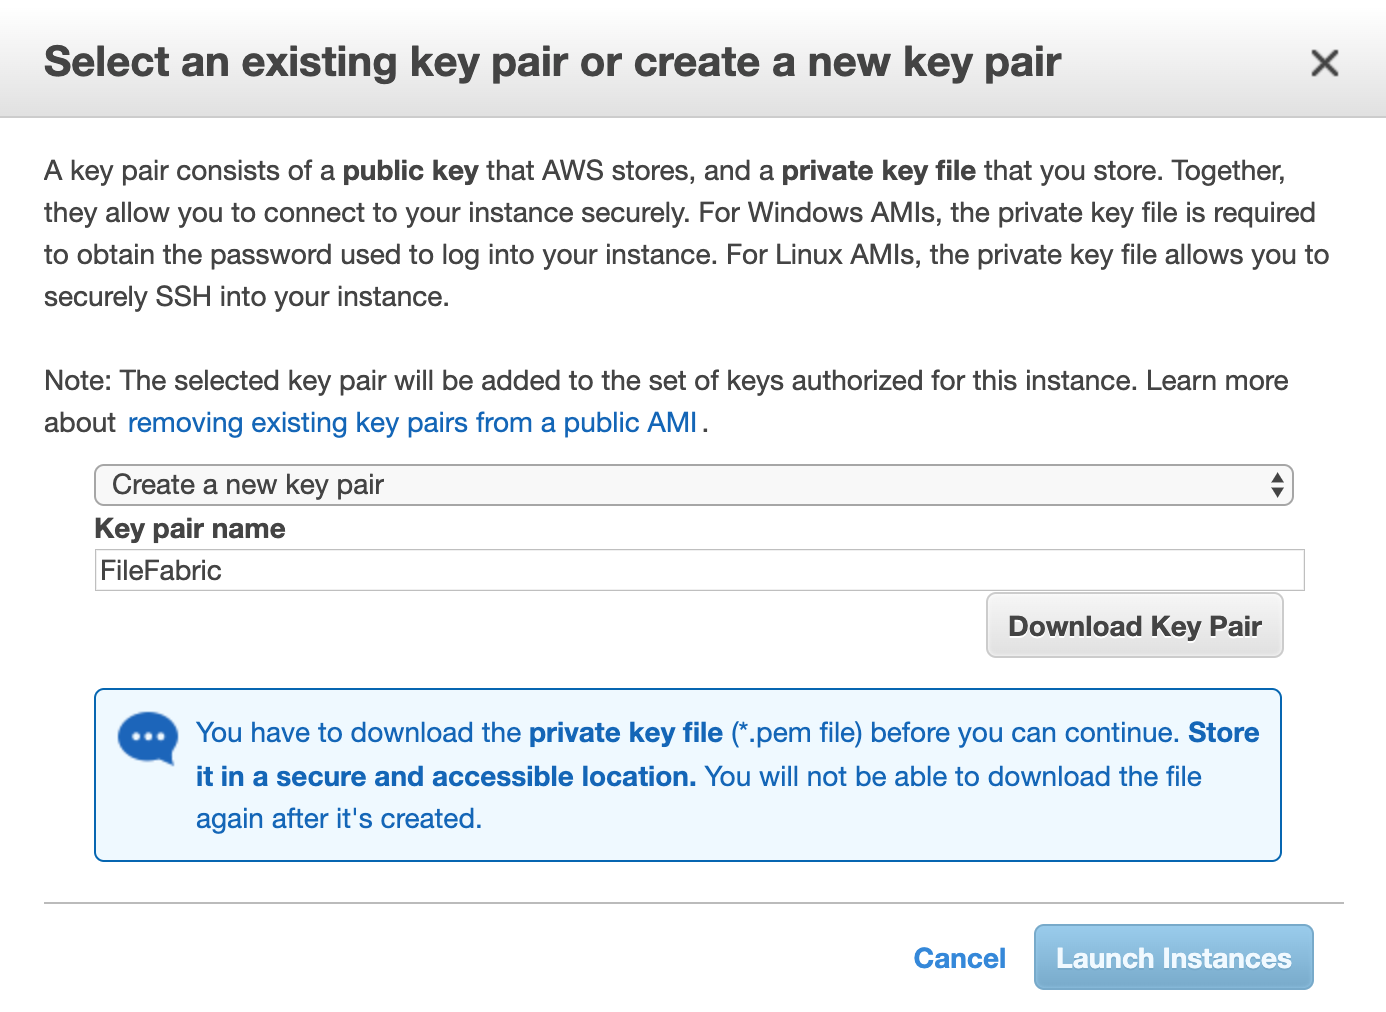
Select Launch Instances.
View Instances
Select View Instances and wait a few minutes until the Status Checks are complete.
Setting Up Instance
Add Static IP Address
To access the instance securely over the internet we'll create a trusted SSL/TLS certificate. We first need a domain name and a static IP address.
To associate a static IP address with the instance from within the AWS Console navigate to Elastic IPs.
Select Allocate Elastic IP address and then Action > Associate Elastic IP address with the File Fabric instance you just created.
SSH Access
The instance can now be accessed at this IP address using a standalone SSH client. The username is smeconfiguser. For example:
ssh -i "FileFabric.pem" smeconfiguser@34.194.216.200
Check that you can become root.
sudo bash
This will be required to complete configuration.
More information on connecting via SSH can be found from the AWS Console. Select the instance in the Instances view and click Connect.
SSL Configuration (Recommended)
The appliance is configured, by default, with DHCP and a self-generated untrusted SSL certificate.
In order to use the client tools (desktop and mobile applications) over SSL you will need a trusted SSL certificate and a fully qualified domain name (FQDN).
Disabling SSL (Not Recommended)
If you do NOT wish to use SSL for the trial you can disable it.
- Log in as the Appliance Administrator as per the the instructions below.
- Navigate to Settings > Site Functionality
- Set Always use HTTPS to No.
- Set Generate secure server side links to No.
- Select Update options at the bottom of the page.
Create DNS entries
Choose three fully qualified domain names (FQDNs). For example:
- files.example.com - Domain name (service endpoint and website)
- files-webdav.example.com - used for WebDAV service
- files-s3.example.com - used for S3 service
Add DNS type A records that point these domain names to the appliance IP Address. For example,
| Type | Name | Value |
|---|---|---|
| A | files | 35.188.82.62 |
| A | files-webdav | 35.188.82.62 |
| A | files-s3 | 35.188.82.62 |
Verify that Public DNS records are setup correctly:
curl -L -k http://files.example.com | head
curl -L -k http://files-webdav.example.com | head
curl -L -k http://files-s3.example.com | head
These commands should resolve the domain name, connect to port 80, get redirected to port 443 and return (part of) the web login page:
<!DOCTYPE html>
<html lang="en">

<head>
	<!-- title -->
		<title>Home | SME Appliance</title>

	<meta content="text/html; charset=utf-8" http-equiv="content-type"/>
	<meta http-equiv="X-UA-Compatible" content="IE=EDGE,IE=11,chrome=1"/>
	<meta name="viewport" content="width=device-width, initial-scale=1.0, maximum-scale=1.0, user-scalable=no"/>
Change Hostname
To update the appliance with the FQDN change to the root user by issuing “sudo bash“ with SSH. As the root user, edit /etc/hostname with nano or vi.
Change the AWS instance name to your FQDN.
files.example.com
Start SME Config Server
Leave root privilege:
[root@ip-10-0-0-192 smeconfiguser]# exit
As the smeconfiguser start the configuration server by typing smeconfigserver. You should see a confirmation that the config server is running:
[smeconfiguser@ip-10-0-0-192 ~]$ smeconfigserver
Please contact me with a browser on port 8080
Hit Ctrl+C when work is done
Now open your browser to:
http://<your_ip>:8080
Configure Hostname Settings
Here you only need to configure the three domain names. Click “Configuration” and then “SME Server Hostname Settings”.
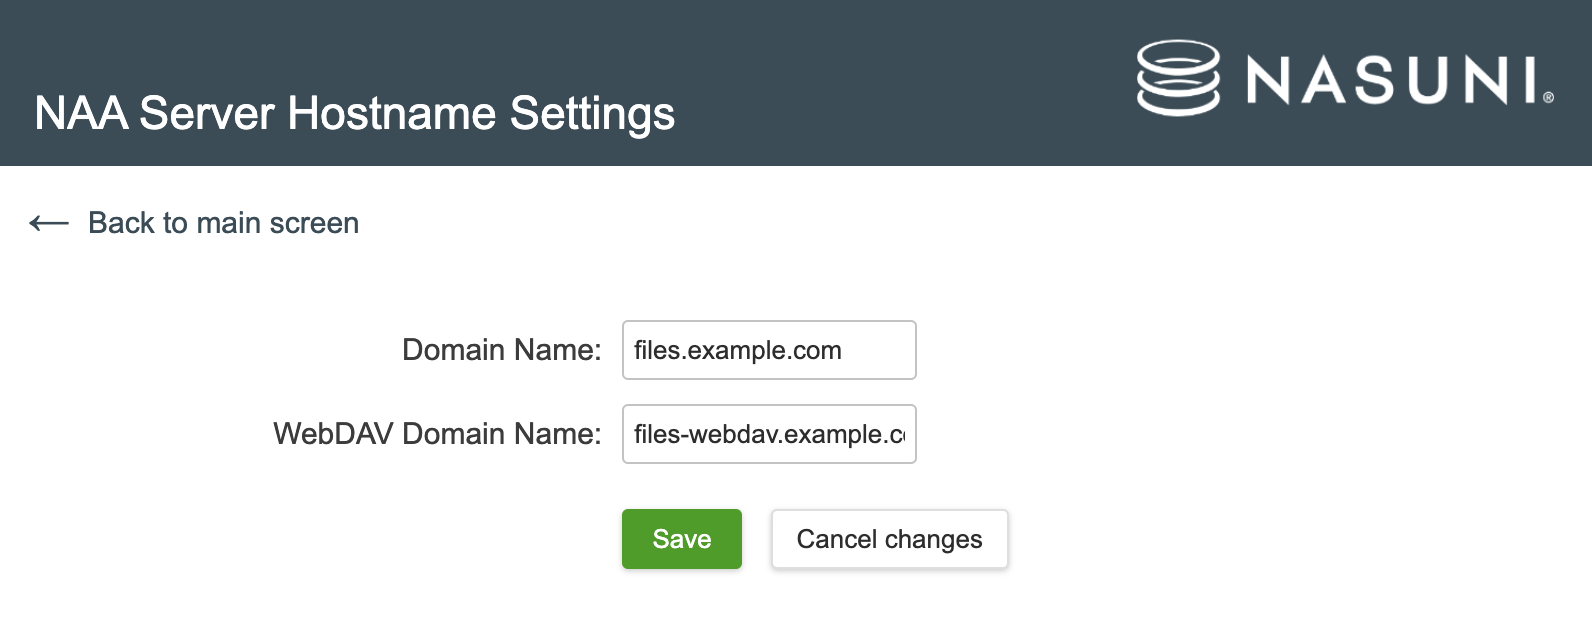
After Saving go to the “Overview” page and scroll down to the bottom to “Apply”. No other changes are required for the appliance on AWS.
Follow the prompts on the page to reboot the appliance. If you are not doing this immediately stop the Config Server by typing Control-C in the terminal window.
Create SSL Certificates
This section creates and configures SSL certificates from Let's Encrypt. If you are using your own certificates (or a different service) you can use the smeconfigserver service above to add certificates.
Log back into the rebooted appliance:
ssh -i "FileFabric.pem" smeconfiguser@34.194.216.200
Elevate to the root user (no password required).
sudo bash
Note: The appliance will be inaccessible during the request which may be up to a minute.
Run the following command:
certbot --no-redirect --authenticator standalone --installer apache --pre-hook "systemctl stop httpd" --post-hook "systemctl start httpd"
This command will prompt for an email address. It’s important to give this information so that an admin can be notified in the future if there are issues automatically renewing the certificate.
Please also agree to the Terms of Service. It is not necessary to share the provided email with the Electronic Frontier Foundation.
Certbot will automatically detect what FQDNs are setup for the Enterprise File Fabric and prompt for which should be included in the certificate.
Which names would you like to activate HTTPS for?
- - - - - - - - - - - - - - - - - - - - - - - - - - - - - - - - - - - - - - - -
1: files.example.com
2: files-s3.example.com
3: files-webdav.example.com
- - - - - - - - - - - - - - - - - - - - - - - - - - - - - - - - - - - - - - - -
Select the appropriate numbers separated by commas and/or spaces, or leave input
blank to select all options shown (Enter 'c' to cancel):
After successful completion, the Enterprise File Fabric will automatically start using the new certificates. These certificates will last for 90 days, so the final step is to setup automated renewal.
Automatically Certificate Renewal
A Let’s Encrypt certificate is valid for 90 days, and can be automatically renewed within 30 days of expiration. A simple cron job will run daily and handle renewals.
Please Note: The File Fabric will be inaccessible during the renewal. Please ensure that the renewal time is during off hours. Downtime will only occur every 60 days when a renewal is required and may last up to one minute.
While still logged in as root run the following command to add a cron job.
crontab -e
In the example below the renewal attempt will process at 2:30AM in the timezone of the Enterprise File Fabric. The Enterprise File Fabric ships by default with the timezone set to UTC time. Please adjust this timezone as necessary.
30 2 * * * /bin/certbot renew >> /var/log/letsencrypt/le-renew.log
This will create a crontab entry for a cron job that will handle the renewals and write its output to a log file.
Use https://www.ssllabs.com/ to test the installation.
Appliance Administrator
Open a browser to the the domain name you assigned:
https://files.example.com
If you haven't set a domain name, use your external IP address:
https://3.234.139.146
You'll see the following login page:

Log into the appliance as appladmin with a password generated from the AWS instance ID:
 User name: appladmin
 Password: eff-<Instance ID>
License Key
Configure your license key under Settings > License Key.
A trial key can be requested from https://www.storagemadeeasy.com/appform/.
Change Admin Password (Optional)
Select “Password/Login” from the Main Menu to change the Appliance Administrator password. After you select “Update password” you will be logged out and need to log back in.
Outbound Email (Recommended)
An SMTP server is used by the appliance to send registration and notification emails to users. It can be configured under Settings > Email & Filebox.
If you do not configure an email server remember not to use email notification when adding users.
Using AWS Simple Email Service
Below is what the screen looks like for an SMTP setup using the AWS Simple Email Service (SES).
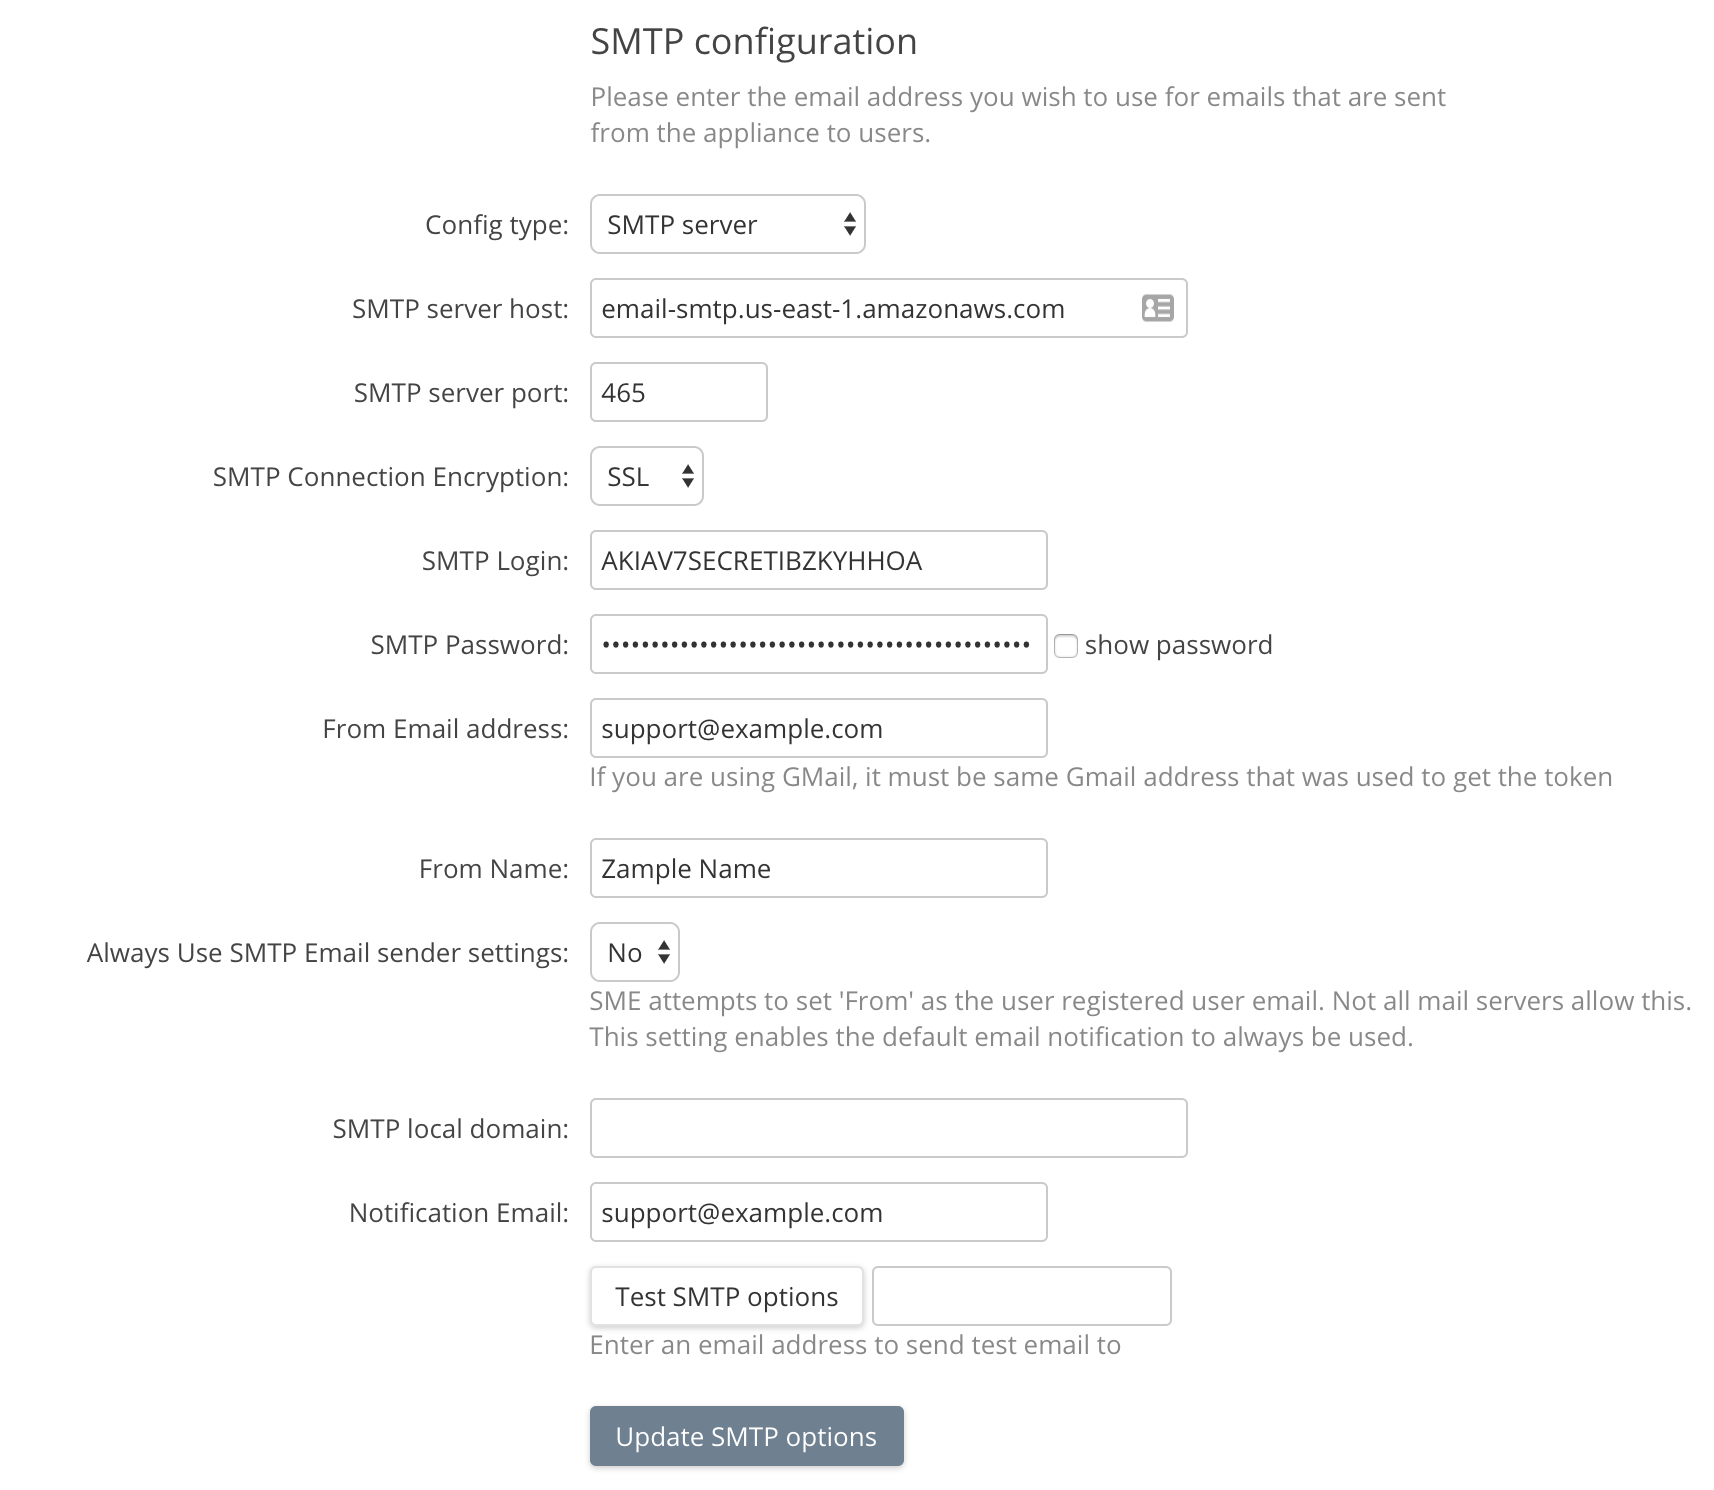
The “Notification Email” address will receive emails from the system warning of license expiration etc. You should enter your email here.
Change Appliance Admin Email
With an SMTP server configured you can change the email of the Appliance Admin. Go to the main menu (Hamburger icon) to Password/Login.
You can also set up Two Factor Authentication (2FA) for the Appliance Admin from this screen.
Server Notification Email
Server errors and a daily report are sent to a notification email that must be configured by the Appliance Administrator. The default is not to email reports.
The “Notification Email” setting is on the “SMTP and Filebox Configuration” page that can be found via the menu “Email and Filebox”.
Create an Organization
An organization is a tenant within the appliance and is created by the Appliance Administrator.
Review User Package (Optional)
The File Fabric platform uses templates for organizations, in order for us to create our organization, we need to pick a template, before we do, let’s review.
Login as the Appliance Administrator.
Click “User Packages” and then click the pencil to modify “Organisation Cloud 20 Users” This is a good template to start from. Scroll down to the “Extra options” section and add “Content Search Enabled” and Dropfolders. Use “Crtl-Click“ to add to the selection.
Create Organization
Login as the Appliance Administrator.
In the hamburger menu, select “Users” and then “Add a User”.
On the Add a User screen create your Organization admin user. (This will also be your organization.)
- User Login: The Organization short name and superuser's username. We recommend the domain name of your company such as “smestorage.com”.
- E-mail: Email address of organizational admin, must be unique to the system, do not use your own.
- Password:
- Name (Company Name): Full organization name.
- Package: The user package template from earlier.
- We do not need to split the license between organizations, leave the last field empty.
Click Save.

Setting Up an Organization
Log out from the Appliance Admin, appladmin user, and log back in as the user you just created.
You will first see the “Add Storage Provider” screen. You have to add storage before you can continue.
Select your provider and follow the instructions on the next couple of screens. See the next section for information on setting up Amazon S3 storage.
Cloud Storage Provider
After logging into the organization you will be prompted to register your cloud storage provider. Choose the provider (for example, Amazon S3) and click Continue to proceed.
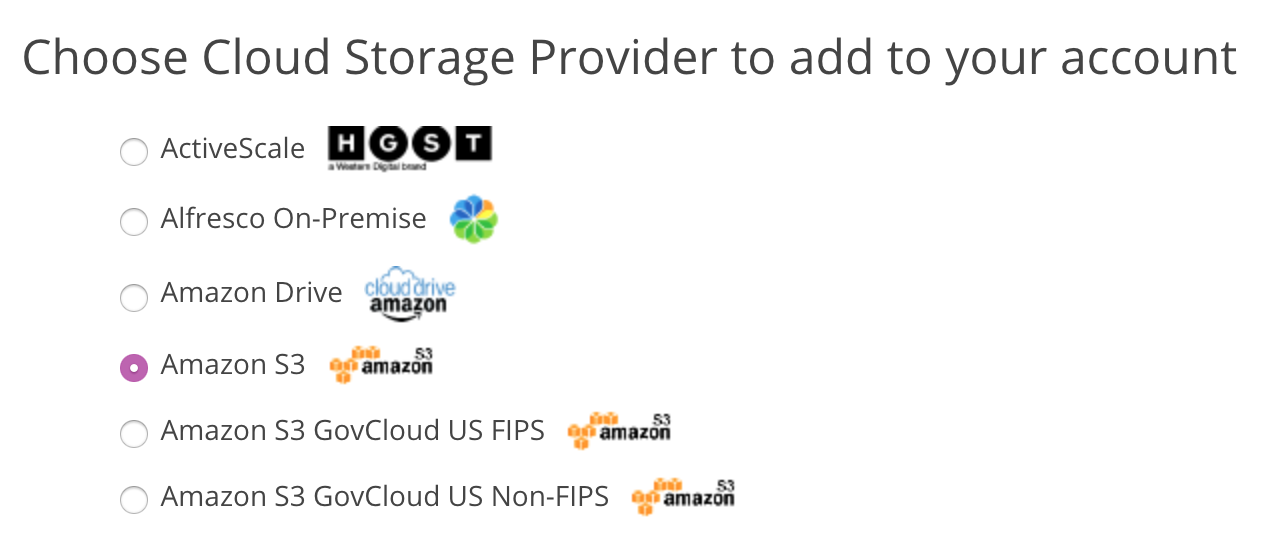
Amazon S3 Provider
Enter your S3 Access key and secret to continue:
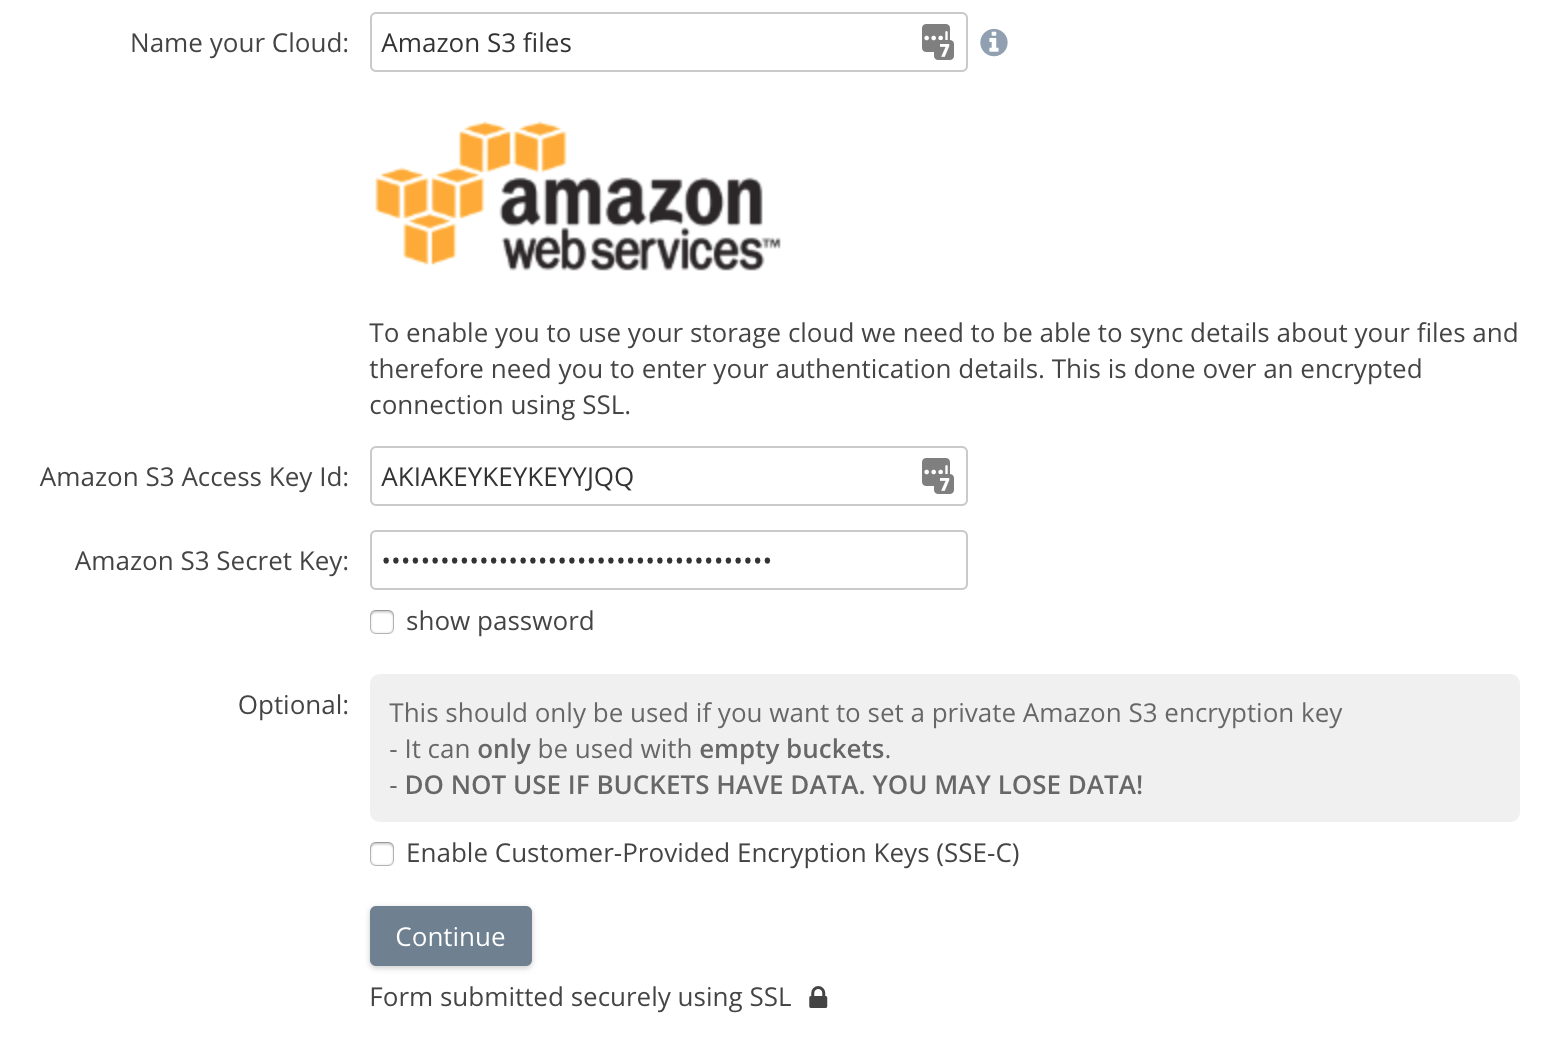
The credentials are validated and a list of buckets in the account are returned. Select the buckets you wish to be indexed. We recommend not using buckets with existing production data for the initial trial.
Select and create a new bucket for default data (at the bottom) before selecting Continue. You are then ready to add users!