Collaboration using Business Groups
last updated on March 18, 2024
Business Groups enable users to create a shared workspace area (akin to an e-room or a data view) to share files with internal and external users. Note that Drop Folders can also be used as an alternative to this, the main difference being that Business Group users need to have an account on Access Anywhere whereas Drop Folder users do not as they are able to access/submit files using an assigned password.
This Business Group feature is different to shared team folders which can be created for users who belong to the same Organization and to which permissions can be applied. Although it is possible to create Business Groups for other team users the only permissions that can be applied are to be able to 'view' or 'view/submit content.
1 About Business Groups
Business Groups enables the creation of a shared workspace with which to share files and folders with other users. Files and folders from one or many different storage systems can easily be be shared in this way.
This means if some files are stored on Amazon S3 or in Azure or on FTP, or wherever they reside users can easily group different files and easily share these with colleagues, customers, prospects, or partner networks. Anyone with whom the files are shared has no knowledge which storage service(s) they are stored on and each time a file is shared with the Group all members receive an email notification letting them know new content has been added with a link to the content.
2 Business Groups Management (web)
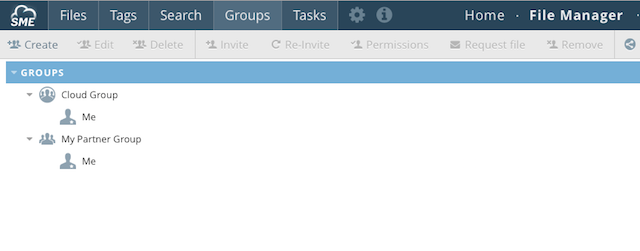
Collaborative sharing can be managed and accessed directly from the Web by launching the File Manager and clicking the Groups Tab. Here new Business Groups can be added and users invited to participate.
3 Inviting Users to Participate
Once you have a group established you can begin inviting users to collaborate and share.
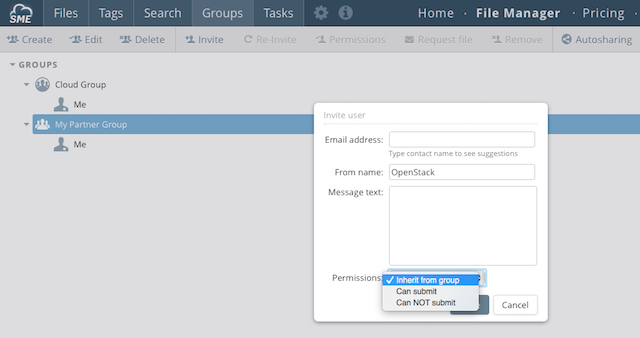
From within the group select Invite.
Supply the email address and invitation message. At this point, you can override the group's default permissions for the user if required.
Click Invite to invite the user.
The user will be sent an email that invites them to join the group. When the user clicks the link, they will be presented with the choice to:
- Sign in with an existing account
- Create an account as an external user.
If they choose to sign in with existing an account, the email address associated that account must match the email address of the invited user, if the organization has the policy enabled to enforce matching emails (default is ON). If the email does not match, then the invitation cannot be accepted by that particular user.
Two or more Access Anywhere users can't have the same email address.
If they choose to create an account, this account will be created as an External User within Access Anywhere. Upon completion of registration, the user will have to activate their account by following a link in their email.
When registering as an external user, the user must use the email associated with the invitation. Registration will require the user to activate their email address as part of this process.
Once the user completes registration and signs in to the system, they will then be able to access the Business Group from the File Manager, and the org. member who invited the external user will receive a notification that the external user has joined.
After signing in the external user can begin accessing files and folders that are shared to the group, as well as being able to contribute files back to the business group if allowed by the permissions assigned to them.
Until a user accepts it the view will show that a user's invitation is still outstanding. It is possible to select the user and re-invite them if the invitation remains outstanding for a period of time.
4 Creating Private Groups (web only)
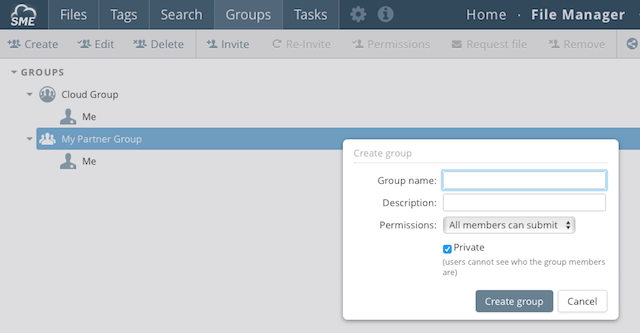
It is possible to create private groups in which none of the members can view who the other person in the group is. This option is only available currently when you create a group from the Web Groups Dashboard.
5 Enable Member Group Submission (web only)
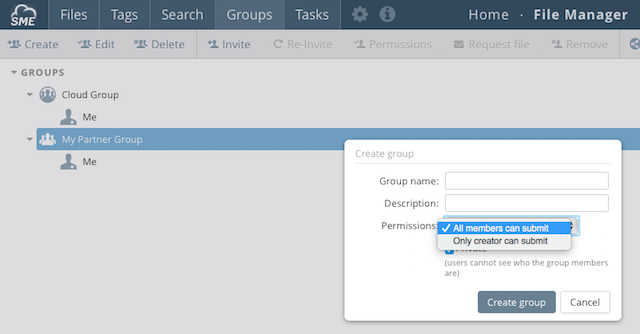
By default the creator is the only person that is allowed to submit content to a group, however it is possible to create a group where all members are allowed to submit content at the time of group creation. This is currently a web option only.
6 Assigning content submission permissions (web only)
If you wish other users to be able to submit content you can do this at the point of invite or you can later go back and edit the user and assign content submission permissions. This is currently a web option only
7 Requesting new Content (web only)
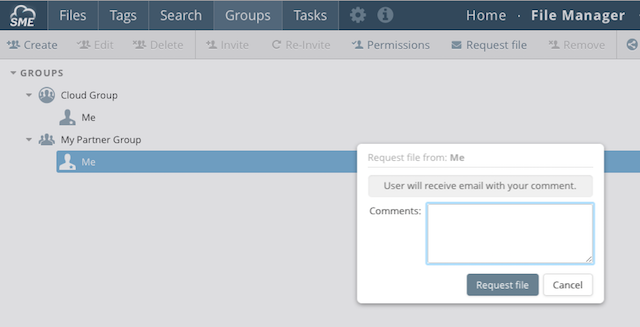
It is possible to request content from a user that has been given the ability to also submit files to the group. Clicking on the users and choosing request will enable you to send the user a message. This is currently a web option only.
8 Sharing Files
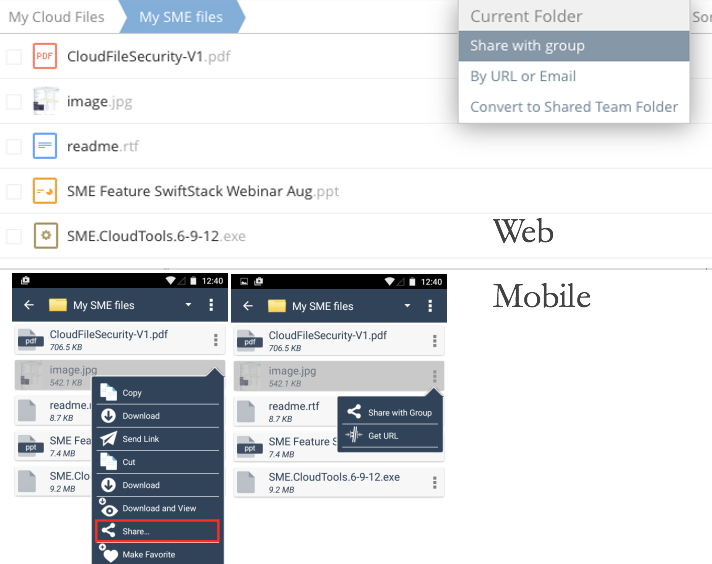
File can be shared using the web or Windows desktopclient. When you share a file with a group, you then choose the group that you wish to share the files with. Once you have chosen this, each member of the groups receives an email with the new files link.
9 Sharing files using Rules (web only)
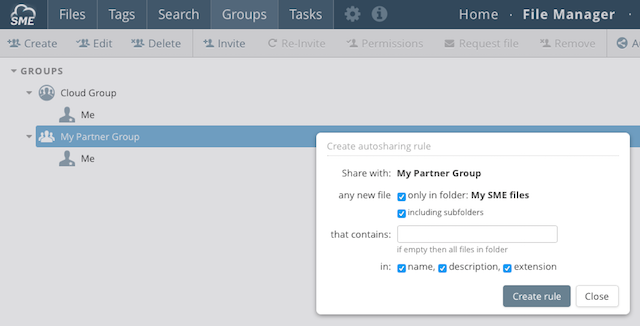
Rather than explicitly sharing content files can be automatically shared using rules. This is a very powerful mechanism to immediately share files as soon as they are added, from any web / desktop / or mobile access client.
The way this works is as follows:
-
Open the File Manager and click on the folder from which you want to set up automatic sharing (in the above example this is set to DropBox files)
-
Navigate to the groups tab, click on the relevant group you wish to share content with, and then click '+ Auto Rule'.
-
Add the conditions on which you want to share files form this folder. Conditions can be based on file name, extension, or description or all three. Enter the string you wish to search on.
-
Choose whether you wish to also have sub folders checked.
-
Click add rule.
Now, when any file is added to the folder or subfolders you selected using the condition you predicated, users of the group selected will receive a file share email.
10 Business Group Management (windows)
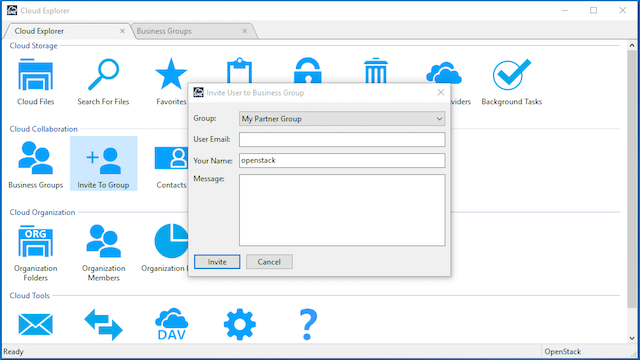
Groups Workspaces can also be managed using the Windows Cloud Dashboard. Here groups can be setup and also users invited.
11 Configuring Business Group workspaces
Group WorkSpaces must be enabled:
- By the Appliance Administrator (appladmin). See Settings > Site Functionality.
- By An Organization Administrator. See Organization > Policies
Appliance Default Storage must be configured in order for external users to upload files.