Edge Extend Server for AWS
This guide covers the launch and network configuration of the Edge Extend Server within the AWS Cloud. Once network configuration is complete return to the /Edgeextend/Server documentation to continue setup.
For general documentation see Edgeextend. .
Architecture
The Server may be deployed as a virtual machine or to an existing Nasuni Access Anywhere instance.
Virtual Machine
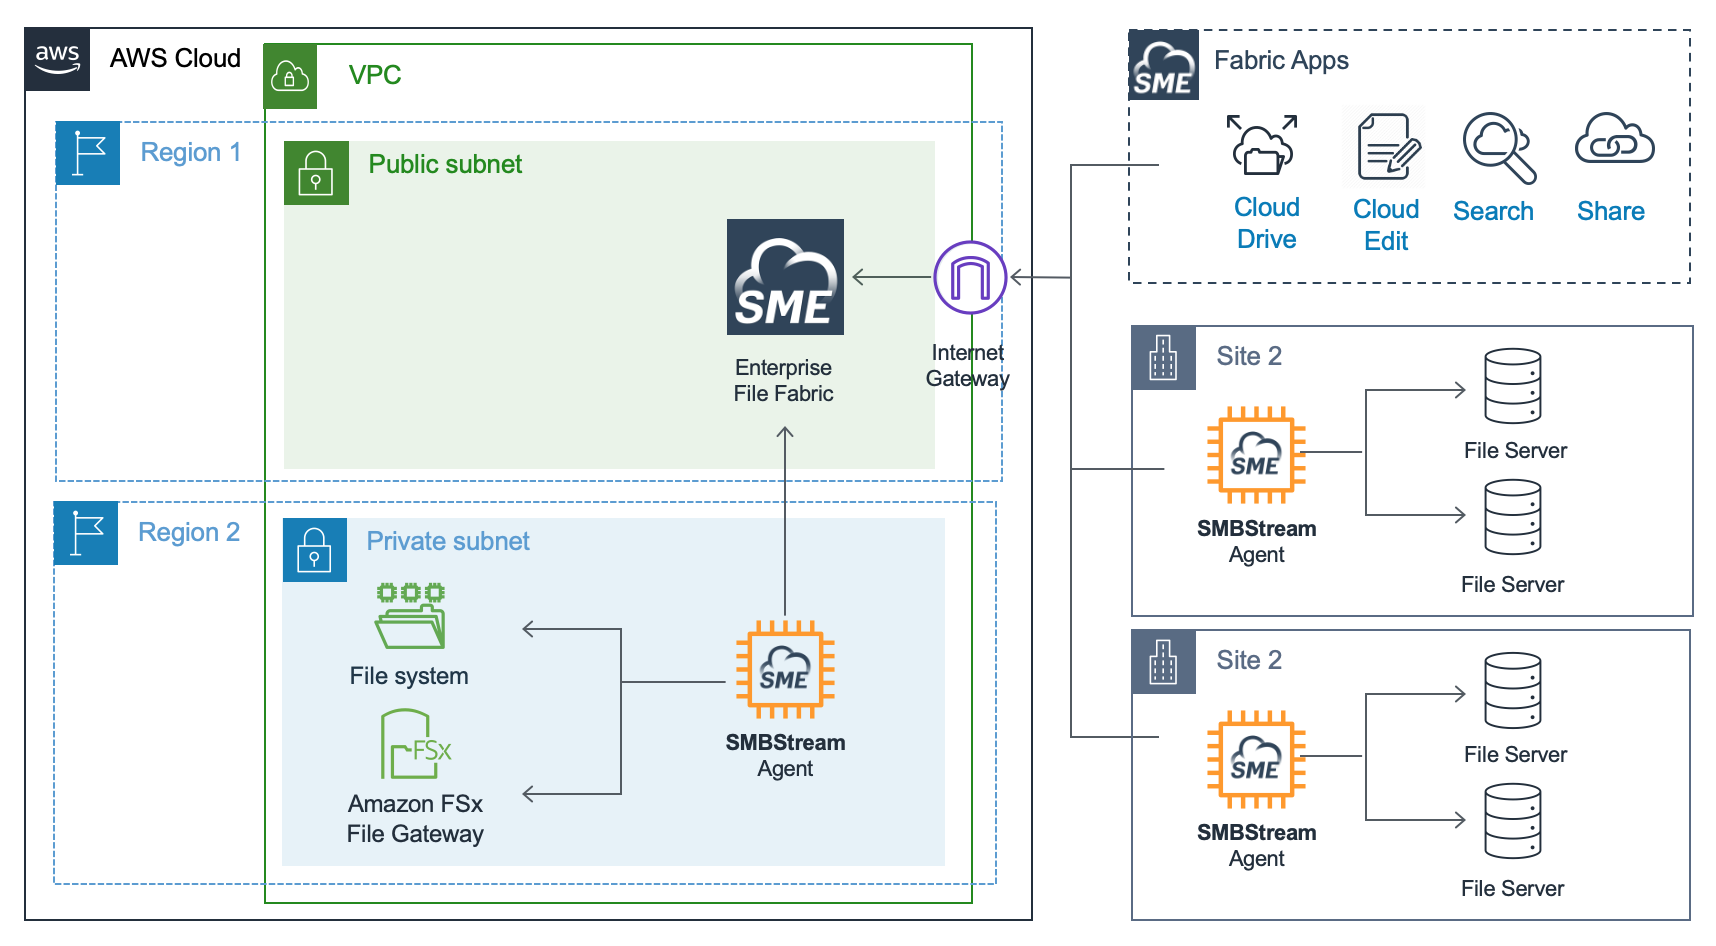
The Edge Extend Server is deployed to the AWS Cloud as a single virtual machine or instance.
Edge Extend agents outside of AWS Cloud or in other AWS regions connect to the Edge Extend server through a public endpoint. They will connect using a UDP protocol through port 8445.
An administrative web application is available over port 8081.
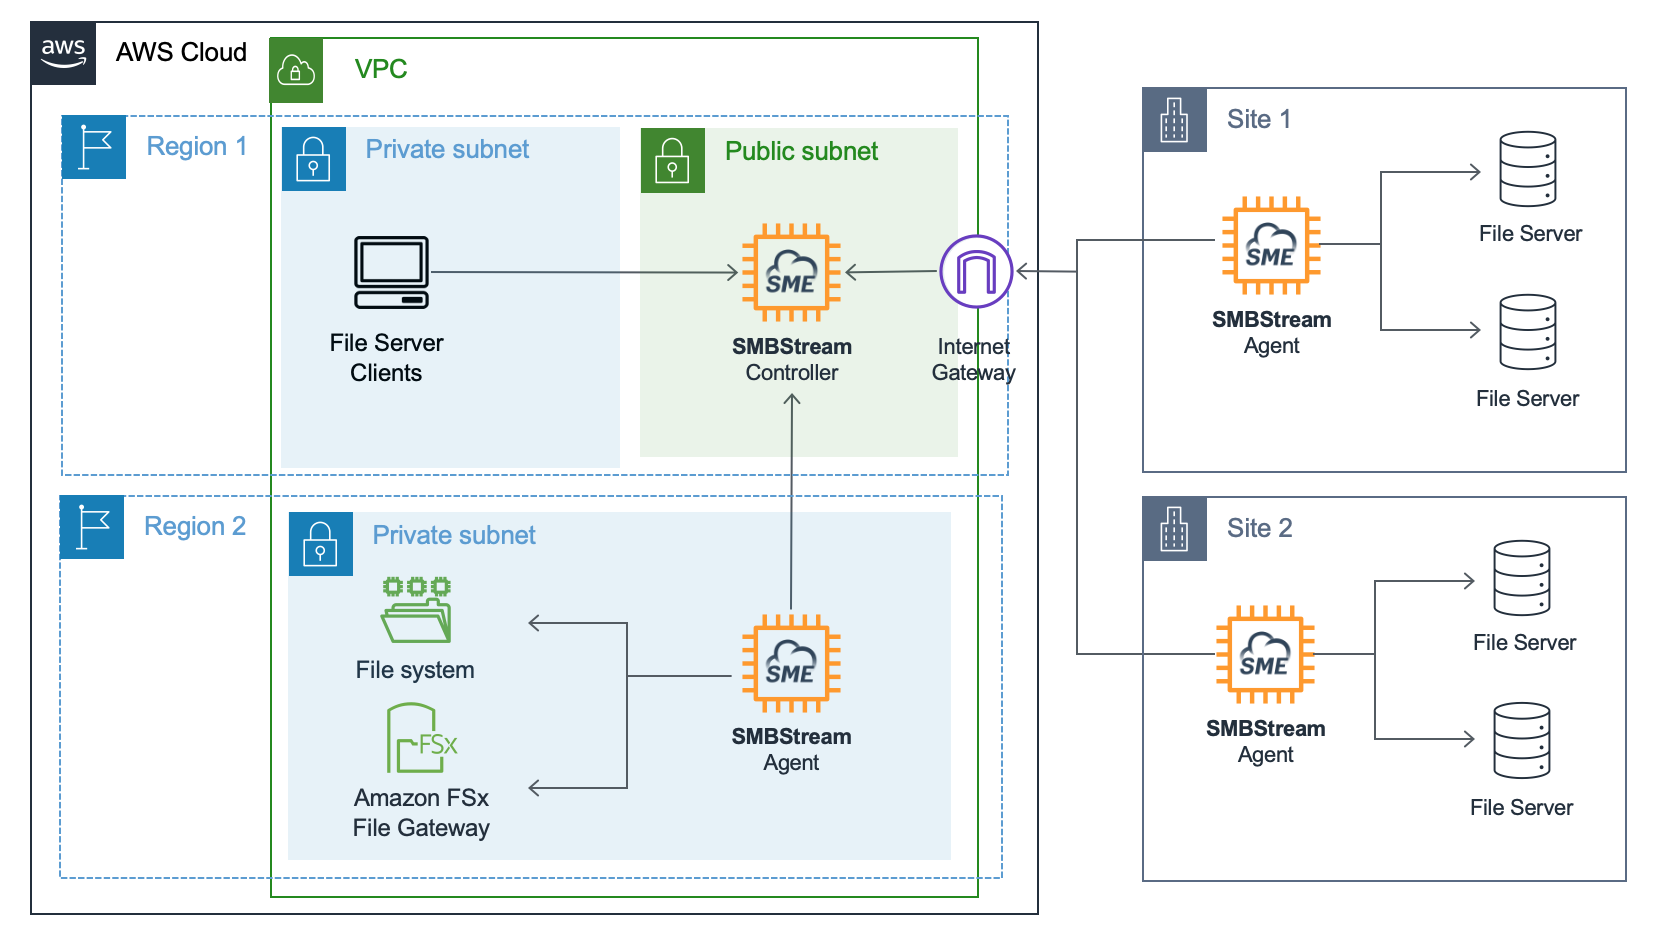
Nasuni Access Anywhere
If you are using Edge Extend with Nasuni Access Anywhere on the AWS Cloud you can install the server on the Nasuni Access Anywhere node itself. See Edgeextend/Server/Accessanywhere.
AWS Components
The server uses the following AWS services:
-
Amazon EC2 – The Amazon Elastic Compute Cloud (Amazon EC2) service enables virtual machine instances to be launched with a variety of operating systems. The server is available as a virtual machine image.
-
Elastic IP Address - An Elastic IP address is a public IPv4 address, reservable through AWS. It can be mapped dynamically to an instance, allowing instances to be changed without affecting their public address. They also allow mapping to a DNS record for your domain.
Deployment
This guide walks through deploying the Edge Extend Server to your AWS Cloud environment as a single-instance software appliance. An instance will be launched directly from the AWS Marketplace. You'll have the ability to choose the target region and size the instance for your requirements. After the appliance is started you'll set up the network.
Skills Required
This guide is for IT infrastructure architects and DevOps professionals who are deploying an Edge Extend server on AWS.
To follow this guide a user should have some familiarity with the AWS Console and with a Linux shell.
Time Required
Following this guide, an Edge Extend server can be deployed in under an hour.
Prerequisites
You will need the following information before you can complete the setup:
- An AWS Account. If you don’t already have an AWS account, create one at https://aws.amazon.com/getting-started/ by following the on-screen instructions.
- Ability to launch an EC2 instance with an Elastic IP address.
- A domain name (recommended).
- License key (required) - For a trial license contact your account manager,
Security
As with all systems you deploy to the AWS Cloud security responsibilities are shared between you and AWS. AWS is responsible for the host operating system and virtualization layer down to the physical security of the facilities in which the services operate. You assume responsibility for the security of the appliance through configuration and management of specific AWS Cloud services and of the appliance itself. Through the appliance, you can delegate specific application and data security responsibilities to designated users and roles.
For more information:
AWS Identity and Access Management
The server does not need access to an IAM user account or role. It does not access AWS services outside the EC2 host.
Operating System Security
The application does not use root or other administrative uses to run internal components. An end-user cannot log in as root – they can use sudo from the user smbstream. A user can log into the smbstream account only by using the SSH key specified during the launch process. AWS doesn't store these SSH keys, so if you lose your SSH key, you can lose access to these instances.
We will announce high-severity security patches when they are available through a security alert (email). This includes security patches to third-party components we may be using and other remediations.
Customer Sensitive Data
Edge Extend provides a number of preventative and detective mechanisms to protect customer data. For more information see Edgeextend/Security.
Data Encryption
Edge Extend encrypts data in motion.
For more information see Edgeextend/Security.
Security Groups
A security group acts as a firewall that controls the traffic for one or more instances. When you launch an instance, you associate a security group with it. You add rules to the security group to allow traffic to or from the instance. You can modify the rules for a security group at any time.
Launch
Launch from AWS Marketplace
From the AWS Marketplace page select "Continue to Subscribe".

Review terms and select "Continue to Configuration".

Select your preferred Region and then select "Continue to Launch"

This page allows you to launch the instance directly from this webpage, or through the EC2 launch instance wizard.
Launch this software

Choose Action
Leave the setting as Launch from Website (Recommended). Instructions for launching from EC2 instead are provided in the section Launch Through EC2.

EC2 Instance Type
Review settings.
Default is t3.small:
- Memory: 2 GiB
- CPU: 2 virtual cores
- Storage: EBS Only
- Network Performance: Up to 5 Gigabit Ethernet
VPC Settings
Subnet Settings
Choose a public subnet.
Security Group Settings
Select "Create New Based on Seller Settings".

Create new based on seller settings
Add a name and description such as "EdgeExtendServer".
Do NOT change the Source (IP or Group) to "My IP" as this setting incorrectly assigns an internal AWS IP address.
Select "Save".
The following inbound firewall rules are required.
| Type | Protocol | Port Range | Source | Description |
|---|---|---|---|---|
| SSH | TCP | 22 | 0.0.0.0/0 | SSH access for initial network configuration |
| TCP | 22 | 0.0.0.0/0 | We access for configuration | |
| UDP | 8445 | 0.0.0.0/0 | Public access point for Edge Extend Agents |
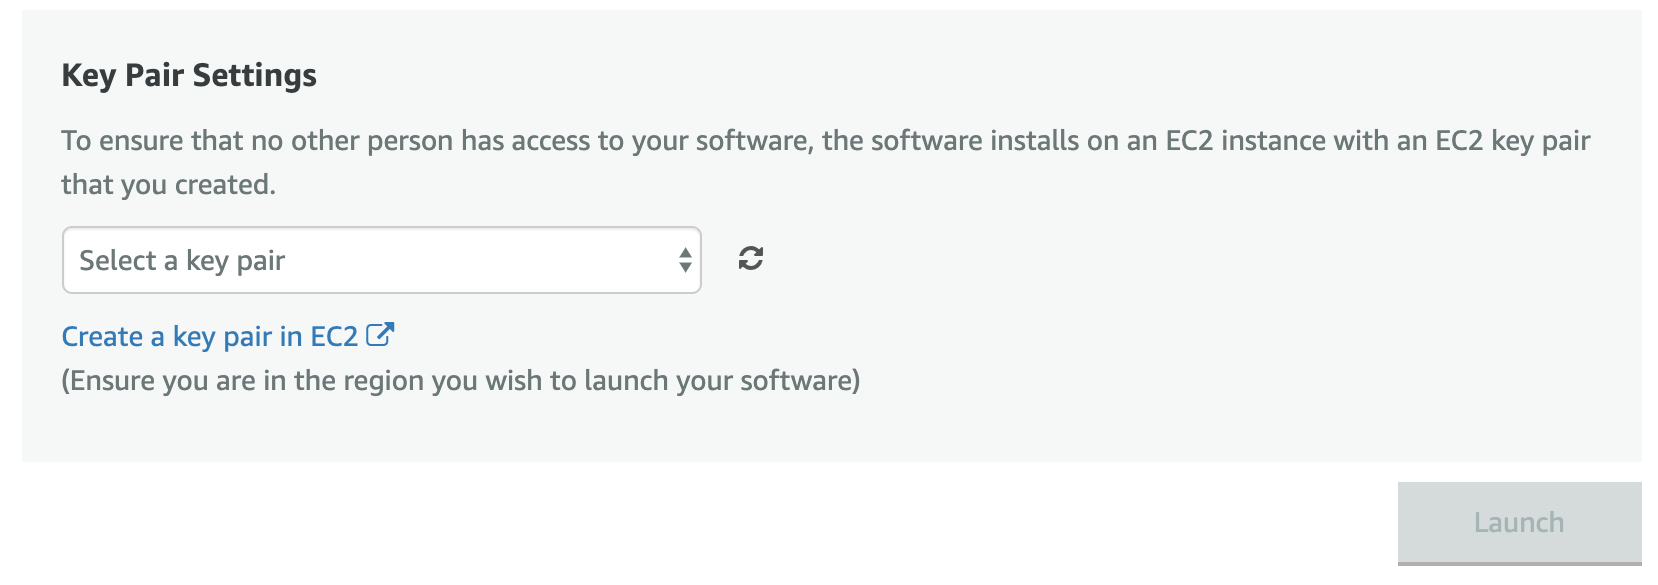
Key Pair
Amazon EC2 uses SSH-2 RSA keys for SSH which is required to complete the configuration. A public/private key pair can be assigned or created.
Choose an existing Key Pair or create a new one.
Launch
Select the "Launch" button to deploy.
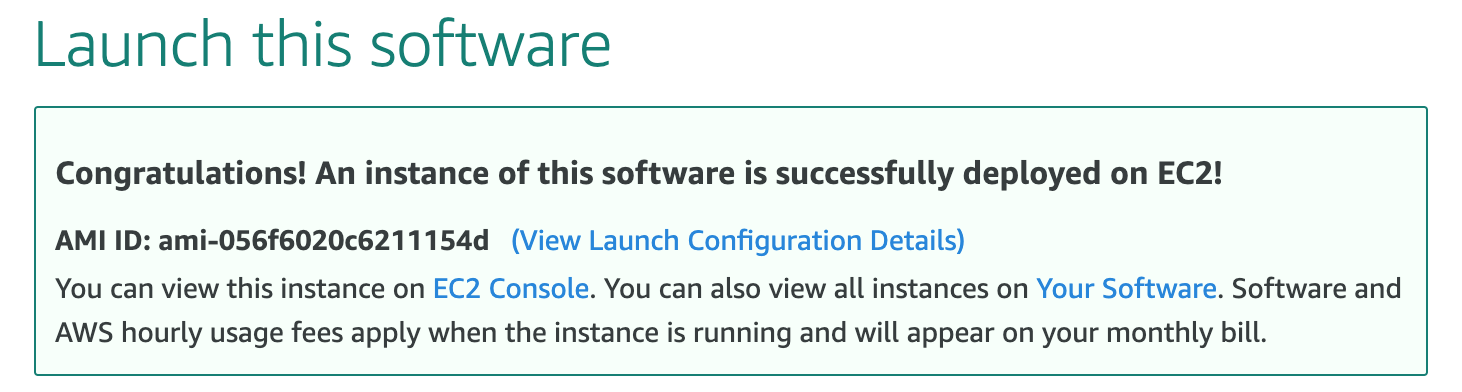
Select EC2 Console to see the instance running in the region you selected.
Add a Name by clicking in the empty Name box and entering "Edge Extend Server".
Jump to the next step #Configuration.
Launch through EC2
If you did not "Launch from the website", follow these steps to launch the instance.
Step 1. Choose an Amazon Machine Image (AMI)
-
From the AWS Marketplace click Edge Extend Server.
-
Then click Launch.
Step 2: Choose an Instance Type
Minimum recommended server settings are:
- vCPUs - 2
- Memory - 2 GB
- Disk - 40 GB (SSD)
This corresponds to a t3.small.
For example,
| Family | Type | vCPUs | Memory (GiB) | Instance Storage (GB) | Network | Notes |
|---|---|---|---|---|---|---|
| t3 | t3.small | 2 | 2 | EBS Only | Up to 5 Gigabit Ethernet | Recommended |
Select "Next: Configure Instance Details".
Step 3: Configure Instance Details
Check the following setting:
- Auto-assign Public IP - set to Enable
Select "Next: Add Storage".
Step 4: Add Storage
Accept the defaults, for example:
| Volume Type | Device | Snapshot | Size (GbB) | Volume Type | Delete on Termination |
|---|---|---|---|---|---|
| Root | /dev/xvda | snap-xxx | 40 | [General Purpose SSD (gp2] | Yes |
You might wish to change "Delete on Termination" to False to prevent your instance from being accidentally terminated through Amazon EC2.
You can also encrypt the root volume here.
Select "Next: Add Tags".
Step 5: Add Tags
No changes, select "Next: Configure Security Group"
Step 6: Configure Security Group
Create a new security group for the server. For example,
Security group name: Edge Extend Server
| Type | Protocol | Port Range | Source | Description |
|---|---|---|---|---|
| SSH | TCP | 22 | Anywhere 0.0.0.0/0, ::/0 | SSH access for initial network configuration |
| Custom TCP Rule | TCP | 8081 | Anywhere 0.0.0.0/0, ::/0 | User interface for administration |
| Custom UDP Rule | UDP | 8445 | Anywhere 0.0.0.0/0, ::/0 | IPv4, IPv6 public endpoint for Edge Extend |
Select "Review and Launch".
Step 7: Review Instance Launch
Select [Launch] to bring up the dialog to choose or create a public/private key pair that will allow you to SSH into the instance.

Select Launch Instances.
Configuration
View Instances
Select View Instances and wait a few minutes until the Status Checks are complete.
Verify Admin Interface
Open the web interface at port 8081.
https://<ip-address>:8081
The default credentials for the server on AWS are:
- Username - The default username is "admin@change.me".
- Password - "smb" plus your Instance ID, for example "smb-i-064d245cb3dab8b"
Since the virtual machine currently has a self-signed certificate your browser may show a warning that the site is untrusted.
SSH Access
The instance can now be accessed at this IP address using a standalone SSH client and the Key Pair you assigned. The username is smbstream. For example:
ssh -i "AccessAnywhere.pem" smbstream@34.194.216.200
(If the command freezes check your Security Group allows SSH access (port 22) for your IP address.)
Check that you can become root.
sudo bash
This will be required to complete the configuration.
More information on connecting via SSH can be found in the AWS Console. Select the instance in the Instances view and click Connect.
Configure Public Endpoint
Agents access the server through a public endpoint, a fully qualified domain name that resolves to a public IP address. We recommend requesting an AWS Elastic IP Address and associating that with the appliance.
Associate Elastic IP address
To add a public IP address with the instance from within the AWS Console navigate to Elastic IPs. You should be in the same region as the instance you deployed.
Select Allocate Elastic IP address and Allocate to reserve the IP Address.
Then choose Actions > Associate Elastic IP address to hook it to Access Anywhere instance you just created. Choose Associate to complete.
SSL Certificates
The appliance includes an untrusted SSL certificate.
Next Steps
Once network configuration is complete return to Edge Extend Server Getting Started to continue setup.