Jibe and Amazon SNS
Jibe is able to receive messages from Amazon SNS and Amazon SQS to identify Amazon S3 objects that have been modified outside the Access Anywhere Server and sync them with Access Anywhere metadata.
For a simpler configuration without Amazon SNS see Jibe and Amazon SQS
For general information see /Jibe.
Overview
In this scenario, Jibe connects to an Amazon SQS queue that subscribes to an Amazon SNS topic that receives S3 notification events.
You'll need to use a topic and queue when you have non-Jibe consumers of S3 notifications. This configuration is also required to send messages across regions and recommended when sending messages across AWS accounts.
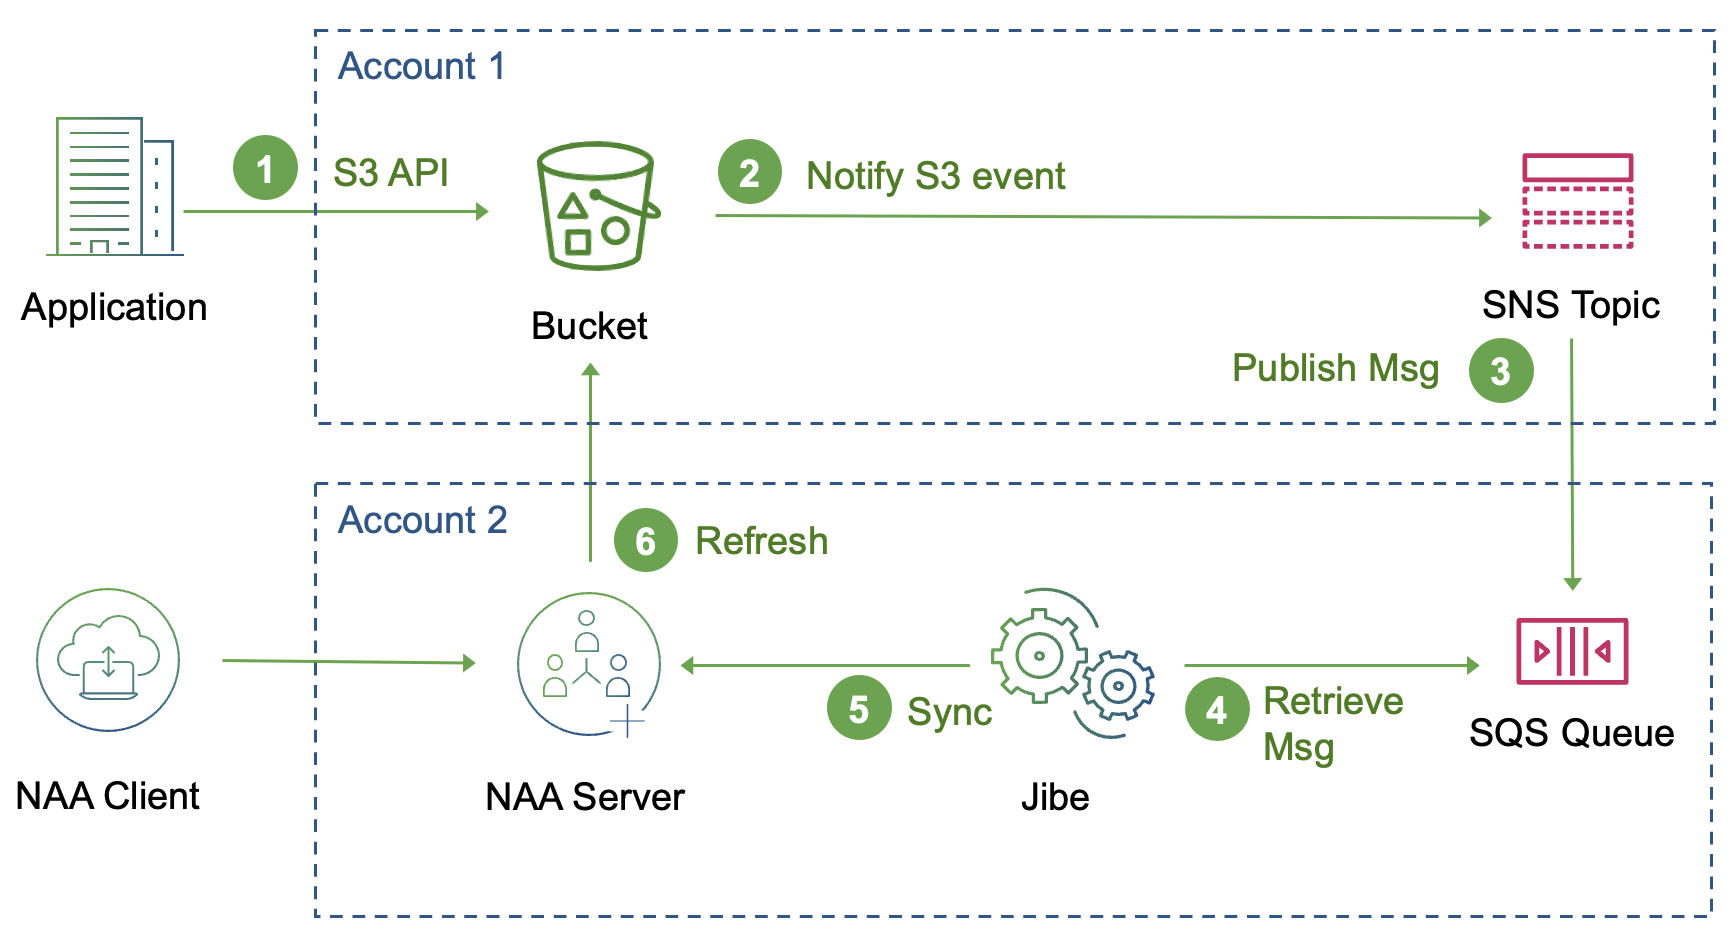
Jibe can also process notifications from bucket replicas.
Getting Started
Access Anywhere Server Setup
Jibe needs a Access Anywhere Server account with an Administrator role in order to synchronize objects. This does not need to be the Org Administator.
Create Topic
Create a topic in the region where your buckets are located.
-
Navigate to the Amazon SNS > Topics.
-
Change regions to where your S3 buckets are located.
-
Create a Topic
Complete the form
- **Type** - Recommend 'Standard'.
- **Name** - For example `jibe-source-activity`
- **Access Policy** - Choose 'Basic'
    - Define who can publish messages to the topic - 'Only the topic owner'
    - Define who can subscribe to this topic - 'Only the topic owner' or 'Only the specified AWS accounts' (if you are creating the queue in another account)
Select Save
Record the ARN, for example
arn:aws:sns:us-east-1:123456789021:jibe-source-activity
Topic Permissions
Before Amazon S3 can publish messages to a topic, you must grant the Amazon S3 principal the necessary permissions.
Replace the access policy attached to the topic with the following policy. In it, provide your SNS topic ARN, bucket name, and bucket owner's account ID. This example allows subscription to the topic by a second account.
{
    "Version": "2012-10-17",
    "Id": "example-ID",
    "Statement": [
        {
            "Sid": "SNS topic policy",
            "Effect": "Allow",
            "Principal": {
                "Service": "s3.amazonaws.com"
            },
            "Action": [
                "SNS:Publish"
            ],
            "Resource": "SNS-topic-ARN",
            "Condition": {
                "ArnLike": {
                    "aws:SourceArn": "arn:aws:s3:*:*:*"
                },
                "StringEquals": {
                    "aws:SourceAccount": "bucket-owner-account-id"
                }
            }
        },
        {
            "Sid": "Access By Another Account",
            "Effect": "Allow",
            "Principal": {
                "AWS": "arn:aws:iam::second-account-id:root"
            },
            "Action": "SNS:Subscribe",
            "Resource": "arn:aws:sns:us-west-1:first-account-id:jibe-source-activity"
        }
    ]
}
Send S3 Events to SNS Topic
Select a bucket to configure from the S3 Management Console.
- Go to the Properties tab
- Scroll to Event notifications
- Select Create event notification
Complete the page:
- For General configuration give an Event name such as "Jibe events"
- Complete Event types
- All object create events - Enable
- All object removal events - Enable
- Complete Destination
- Change Destinationo to SNS Topic
- Select your topic from the drop-down
If your topic is not available check you are in the same region.
If you get this error there is a problem with granting Amazon S3 permissions to publish to your SNS Topic.
Unable to validate the following destination configurations
For more information see Walkthrough: Configuring a bucket for notifications (SNS topic or SQS queue)
Set up a Queue
Create a "Standard" SQS Queue in the account and region where your EC2 instances are running.
-
Navigate to the Amazon SQS > Queues.
-
Change the region to where your SNS topics are located.
-
Select Create queue
-
Complete Details section
-
Type of 'Standard'
-
Name or
jibe-source-activity(for example) -
Complete Configuration section
-
Visibility timeout - Enter 5 minutes
- Message retention period - Enter 14 days
- Delivery delay - Leave as 0 seconds
- Maximum nessage size - Leave as 256 KB
-
Receive message wait time - Choose 20 seconds
-
Access Policy
-
Define who can send messages to the queue - leave as 'Only the queue owner'
-
Define who can receive messages from the queue - leave as 'Only the queue owner'
-
Select Create queue and record the QueueArn.
Subscribe to Amazon SNS topic
The next step creates a subscription from the queue to the topic.
-
With the queue you just created choose the tab SNS subscriptions.
-
Choose Subscribe to Amazon SNS topic.
-
From the drop down select "Enter Amazon SNS topic ARN"
-
Enter the ARN you copied earlier.
-
Select Save.
AWS IAM Role
If the SQS queue and EC2 instance where Jibe is running are in the same AWS account you can use a role to grant access instead of credentials.
For example, create an IAM role called JibeConsumeMessagesRole with the following policy,
replacing the Resource with an ARN filter that matches your account and queue.
{
    "Version": "2012-10-17",
    "Statement": [
        {
            "Sid": "VisualEditor0",
            "Effect": "Allow",
            "Action": [
                "sqs:DeleteMessage",
                "sqs:GetQueueUrl",
                "sqs:ReceiveMessage",
                "sqs:GetQueueAttributes"
            ],
            "Resource": "arn:aws:sqs:*:410679986536:jibe-source-activity"
        },
        {
            "Sid": "VisualEditor1",
            "Effect": "Allow",
            "Action": "sqs:ListQueues",
            "Resource": "*"
        }
    ]
}
Add the IAM role to your EC2 instance. You can do this from the instance detail page. Choose Actions > Security > Modify IAM Role.
Jibe Setup
Continue to set up Jibe as per the section Jibe Setup in Jibe and Amazon SQS.