Jibe and Amazon SQS
Jibe is able to receive messages from Amazon SQS to identify Amazon S3 objects that have been modified outside the Access Anywhere Server and sync them with Access Anywhere metadata.
For Cloudian specific documentation see the Jibe and Cloudian SQS guide.
For general information see /Jibe.
Overview
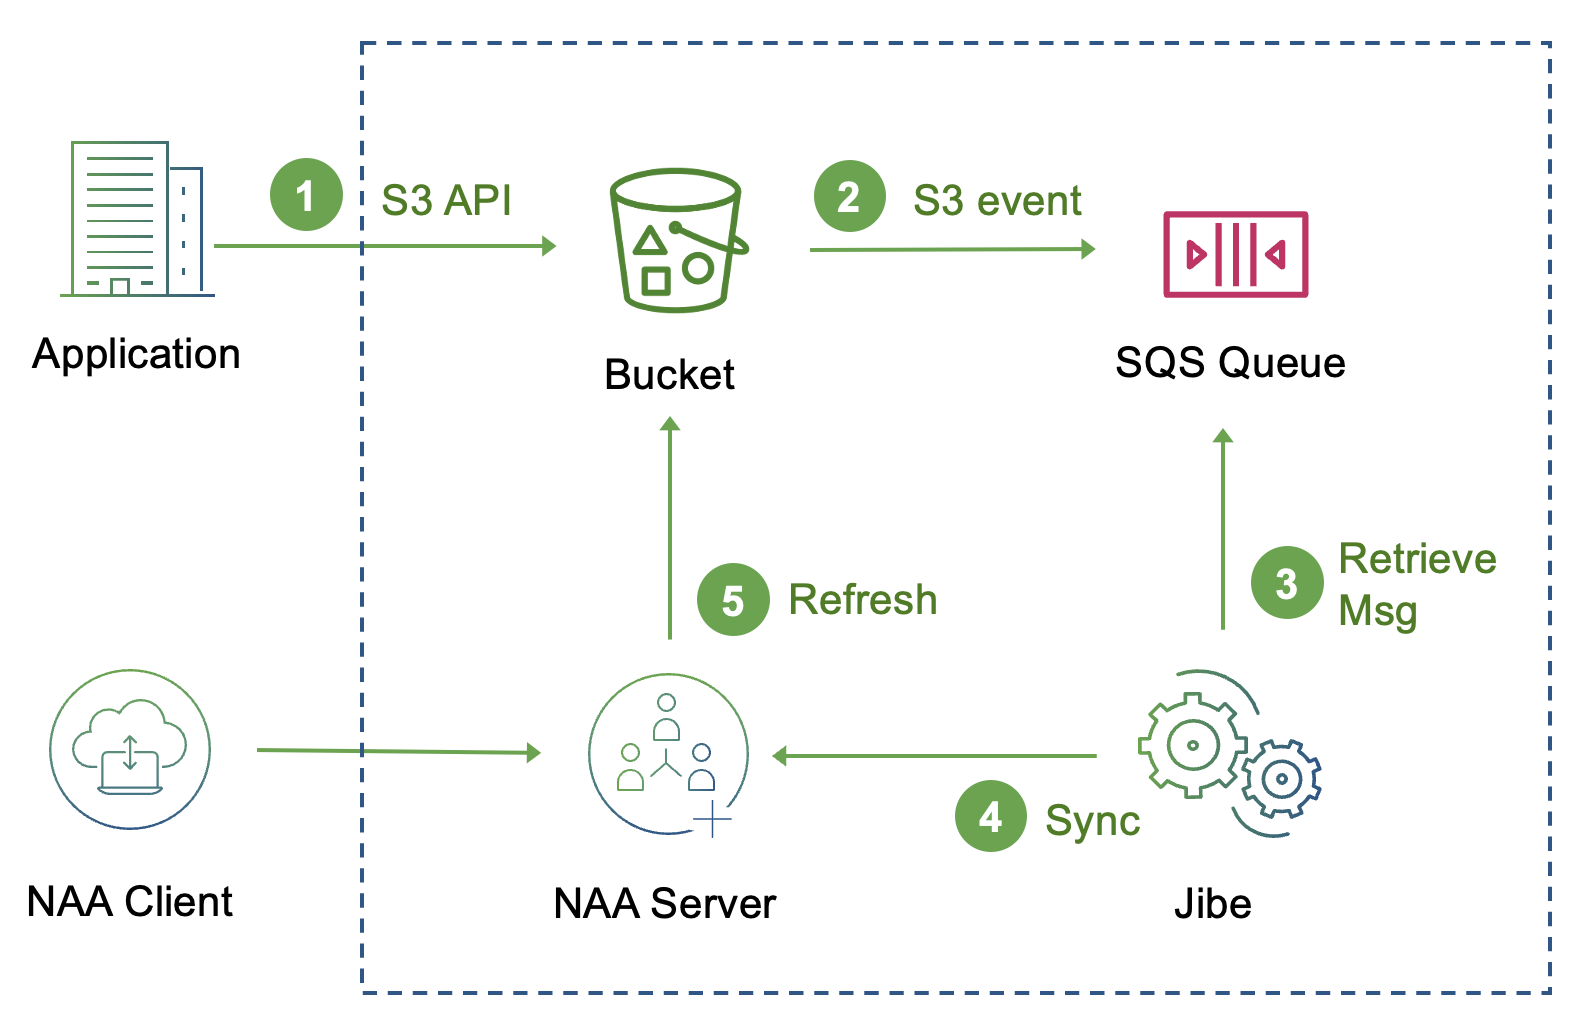
The Jibe SQS Source connects to an Amazon SQS queue to retrieve S3 notification events.
Queue Deployment
A simple deployment has each bucket sending events to a queue in the same region from which Jibe will retrieve events. If you have buckets in many regions, or multiple accounts you can create multiple queues in different regions and accounts.
Sequence:
- S3 API - Applications call Amazon S3 APIs to create and delete objects.
- S3 Events - Amazon S3 buckets (if configured) send messages with S3 Event notifications to the Amazon SQS queue.
- Retrieve Message - Jibe consumes messages from the queue, each of which contains one or more S3 Event notifications.
- Request Sync - Jibe requests that Access Anywhere Server resync objects.
- Object Sync - The Access Anywhere Server verifies the object status with S3 and updates its metadata.
Amazon S3 can only send S3 notifications to one target. This could be a queue, topic or Lambda function. If you have non-Jibe consumers of these notificatins you should send notifications to a topic instead, and have the Jibe queue subscribe to the S3 events through the topic. See Jibe and Amazon SNS for more information.
Jibe can also process notifications from bucket replicas.
Getting Started
Access Anywhere Setup
Jibe needs an Access Anywhere account with an Administrator role in order to synchronize objects. This does not need to be the Org Administator.
AWS Setup
You can create one or queues supporting one or more buckets, regions and accounts.
Set up a Queue
Create a "Standard" SQS Queue in the region where your buckets are located.
-
Navigate to the SQS Management Console.
-
Change regions to where (most of) your S3 buckets are located.
-
Create a Standard Queue with the Name
jibe-source-activity.
Record the QueueArn
If you have buckets in other regions create queues in those regions as well.
Queue Permissions
Change the Queue Access Policy to allow the S3 service to send events to it's target queue:
Use your aws:SourceAccount and Resource.
{
    "Version": "2012-10-17",
    "Id": "example-ID",
    "Statement": [
        {
            "Sid": "example-statement-ID",
            "Effect": "Allow",
            "Principal": {
                "Service": "s3.amazonaws.com"
            },
            "Action": [
                "SQS:SendMessage"
            ],
            "Resource": "arn:aws:sqs:us-east-1:410793986536:jibe-source-activity",
            "Condition": {
                "ArnLike": {
                    "aws:SourceArn": "arn:aws:s3:*:*:*"
                },
                "StringEquals": {
                    "aws:SourceAccount": "410679986536"
                }
            }
        }
    ]
}
Send S3 Events to SQS Queue
Select a bucket to configure from the S3 Management Console.
- Go to the Properties tab
- Scroll to Advanced settings and select Events
- Select Add notification
- Change Send to to SQS Queue
- Select your queue from the drop-down
If you get this error you'll need to add permissions to your SQS Queue.
Unable to validate the following destination configurations. Permissions on the destination queue do not allow S3 to publish notifications from this bucket. (arn:aws:sqs:us-east-1:1234567890:bucket-activity)
You will need the Queue Name or Queue URL, and AWS credentials with permission to consume messages from that queue. (Jibe uses a default queue name of 'jibe-source-activity'.)
AWS IAM Role
If the SQS queue and EC2 instance where Jibe is running are in the same AWS account you can use a role to grant access instead of credentials.
For example, create an IAM role called JibeConsumeMessagesRole with the following policy,
replacing the Resource with an ARN filter that matches your account and queue.
{
    "Version": "2012-10-17",
    "Statement": [
        {
            "Sid": "VisualEditor0",
            "Effect": "Allow",
            "Action": [
                "sqs:DeleteMessage",
                "sqs:GetQueueUrl",
                "sqs:ReceiveMessage",
                "sqs:GetQueueAttributes"
            ],
            "Resource": "arn:aws:sqs:*:410679986536:jibe-source-activity"
        },
        {
            "Sid": "VisualEditor1",
            "Effect": "Allow",
            "Action": "sqs:ListQueues",
            "Resource": "*"
        }
    ]
}
Add the IAM role to your EC2 instance. You can do this from the instance detail page. Choose Actions > Security > Modify IAM Role.
Jibe Setup
Install Jibe as per the instructions at Docker and Jibe.
Configuration File
Change the endpoint and credentials in /root/jibe/config/jibe-config.json to those of
your Access Anywhere server.
{
    "endpoint":"https://storagemadeeasy.com",
    "login":"myorgname",
    "password":"*****"
    "upload_folder": "/S3 Cloud/sme-berkeley",
    "flavor": "SQS",
    "sources": [
        {
            "name": "S3 Files",
            "skip_principal_id": "A3GNHXP31L9JLD!"
        }
    ]
}
Source
An SQS source must (1) have a flavor of SQS, (2) provide a handle to the queue, and (3) provide credentials with permission to call the SQS API.
A flavor is inherited by child sources unless set explicitly within the source:
"flavor": "SQS"
The default queue name is 'jibe-source-activity', or it can be explicitly set within the source.
"queue_name": "my-jibe-queue"
You may optionally provide a region:
"aws_region": "us-west-1"
Jibe will look up a queue by name for your account within the region-specific, or if no region is given us-east-1.
You can force a specific queue to be used by providing the full URL instead:
"queue_url": "https://sqs.us-east-1.amazonaws.com/410679986536/jibe-source-activity"
AWS Credentials can be provided through the configuration file:
"aws_access_key_id" : "AIDALDXPRHQHQE5VYHTNW",
"aws_secret_access_key" : "1z2X4GgRV+2vQz6chTqyhQjtYwbCYUm1shX6s5"
If these are not given the "default" profile is used. It can also be specified:
"aws_profile": "Marketing"
The profile can be configured with:
% aws configure --profile Marketing
AWS Access Key ID [None]: 00f234234aad23128067
AWS Secret Access Key [None]: +RrYCDsuqhXOAHkm9zF2bTVljw99999999999
Default region name [None]:
Default output format [None]:
Skip Access Anywhere Events
Optional: Ignore events from this AWS User. Can be used to skip processing S3 events from actions generated by Access Anywhere Server. (You could also add as a filter to subscriptions)
"skip_principal_id" : { "AIDALDXPRHQHQE5VYHTNW" }
For more information see Jibe Configuration and Jibe Logging.
Bucket Replication
If you are using AWS bucket replication you can receive events from the destination bucket but apply them to the source bucket.
Use the setting bucket_replica to provide a regexp pattern that, given the destination bucket
name returns the source bucket name. The default is:
"bucket_replica" : "^(.+)-replica"
This can be set globally, or for a given provider.
Self Test
Jibe includes a self-test that uses the S3 API to create test events. By default, it will use the credentials provided for SQS.
"sources": [
    {
        "name" : "Amazon S3 files",
        "aws_profile": "default",
        "self_test_folder" : "sme-oakland/jibe_test",
        "self_test_enabled" : true
    }
]
To use different credentials use "sqs" for SQS access and "aws" for S3 testing.
"sources": [
    {
        "name" : "Amazon S3 files",
        "sqs_profile": "default",
        "aws_profile": "testing",
        "self_test_folder" : "sme-oakland/jibe_test",
        "self_test_enabled" : true
    }
]
For more information see Self Test.
Implementation Notes
-
Metadata in Access Anywhere is updated in most cases within 30 seconds after objects are updated in Amazon S3.
-
S3 Events can be received out of order.
-
Duplicate events are also possible