Keycloak Setup
last update on Feb. 11, 2022
We have stopped development of the Keycloak integration and we intend to retire it in the future. Customers who are not yet using Keycloak with Access Anywhere are advised not to begin doing so. Customers who are already using Keycloak should begin planning their migrations away from it. We recommend that those customers consider Access Anywhere native authentication or Access Anywhere External Users as replacements.
Keycloak is a SAML based authentication that can be used in conjunction with Access Anywhere for user login. Keycloak has been integrated with Business Groups workflows to allow for external user registration.
Requirements
Access Anywhere v2006 or greater
Setup
In a multi-node setup, please consult support to evaluate which node should run Keycloak.
SSH into the node as smeconfiguser and become root:
su -
Ensure Keycloak is updated to latest version and running:
If using signed certificates copy them to:
/var/www/smestorage/containers/keycloak/data/certs
Public certificate and chain file must be named cert.crt
Private key file must be named priv.key
Edit /var/www/smestorage/containers/keycloak/data/conf.d/ssl.conf
Change the server_name field on 3rd line of the file to the desired FQDN
Start Keycloak
Configure Keycloak via Browser
Navigate to https://FQDN:8443 or https://IPAddress:8443 of the Keycloak system and login to the administrative console.
Username: appladmin
Password: JuWF4zaRXBHB8j
It is suggested that the appladmin password gets immediately rotated from the default. Click appladmin in the top right corner and select Manage Account.
Click the Password tab on the left and change the default password.
Click Back to Security Admin Console to return to configurations.
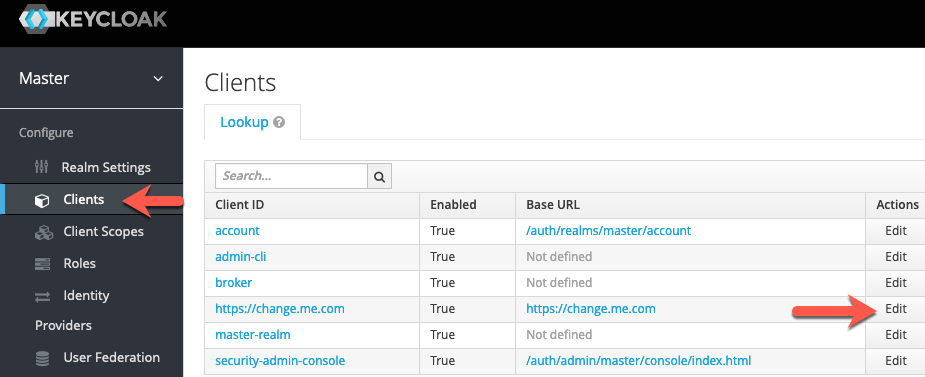
Find the following fields and change "change.me.com" to the FQDN of Keycloak. - Client ID - Valid Redirect URIs - Base URL - Master SAML Processing URL
Under Fine Grain SAML Endpoint Configuration change the following 4 values - Assertion Consumer Service POST Binding URL - Assertion Consumer Service Redirect Binding URL - Logout Service POST Binding URL - Logout Service Redirect Binding URL
Click Save at the bottom of the page
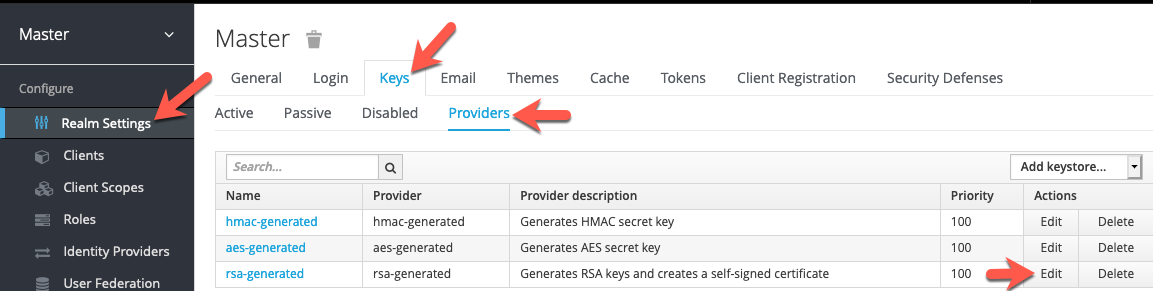
Navigate to Realm Settings on the Left Panel. Click Keys -> Providers -> Edit on rsa-generated
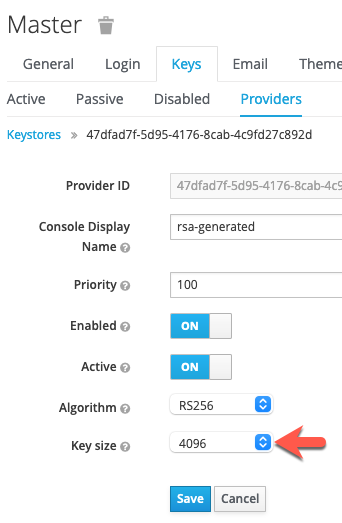
Change the Key Size to 4096 and click Save.
After clicking save, you will be logged out of Keycloak.
Please log back in and return to Realms -> Keys.
Click the Certificate button to the right of the RSA256 row.

Copy the text that appears on screen into an editor. You will need this data in a later step.
Configuring Access Anywhere
Login as the Organization Admin and click the Organization -> Auth Systems menu item in the top right corner.
Add a SAML Auth System
Use the following settings.
- Auth System Name: Keycloak (suggested, name as you like)
- Login button label: External User Resgistration / Login (Suggested)
- The Service provider entity ID: https://FQDN.of.AccessAnywhere
- SSO entry point: https://FQDN.of.Keycloak:8443/auth/realms/master/protocol/saml
- The logout service endpoint: Same as above
- x509 Certificate: Paste the RSA Certificate from Keycloak
- Force authentications: Yes
- Sign AuthnRequest and Logout Request: Checked
- Generate X.509 Signing Certificate: Click this once
- Download X.509 Signing Certificate: Click this an save, you need it later
- Fetch user Role/ Group Name by ID: Unchecked
- Auto Create User on Login: Checked
- Refresh role/group membership on login: Checked
- Auto create new role/groups on Login: Checked
- Update user info on login: Checked
- Unique User Attribute Field: username
- User Login Field: username
- User Name Field: fullname
- User Email Field: email
- Role/Group Name Field: groups
- User Phone Field: phone
Do Not Set any fields after Phone field
Click Test Settings, Then Update Auth System
Finish Keycloak Setup
Return to Keycloak and Click on Clients -> Edit client with your FQDN Click SAML Keys at the top of the screen and then import.

Select Archive Format: Certificate PEM then click Import File and provide the file that was downloaded from Access Anywhere when Download X.509 Signing Certificate was clicked.

You can now sign out of Keycloak by clicking Appladmin in the top right corner and selecting Sign Out
In a new browser window, navigate to Access Anywhere. There should be a new signin button. Clicking this should bring the user to the keycloak login page.
External users created by Business groups can now use Keycloak to register.