Windows Desktop Installation
The Windows Desktop installer includes Cloud Drive, Cloud Sync and Cloud Edit desktop applications for Nasuni Access Anywhere. For customizing settings and features for a rollout to many users we recommend using the Packager.
The windows application suite can be installed on 32 bit or 64 bit Windows. They are certified against the most recent desktop version of Windows with its most recent service pack. The Apps include:
- Control Panel
- Libre Office and Microsoft Office Cloud Toolbar plugins
- Cloud drive (assigned a drive letter)
- Cloud Dashboard Explorer
- Cloud Edit
The virtual drive installs new drivers and required a reboot.
See also :
Installation
The installer requires elevated administrator permissions to register DLL's and add registry entries. If elevated permissions are not provided during the installation process (including reboot and login), or are blocked by some third party app, some aspects of the Apps may not work as expected.
Anti Virus Exceptions
You should exempt any commercial or Windows virus software that scans files, particularly if you are using the Cloud Drive and Cloud Sync. Symptoms can include the drive hanging, or not starting, or being very slow to work with. If this occurs you will need to make an exemption or whitelist the software.
Cloud Drive uses these locations. (The location of the cache can be changed via settings)
%LOCALAPPDATA%\Temp
%LOCALAPPDATA%\Cloud.Drive.Cache
You may also need to exclude program files (particularly for Cloud Sync). You may see issues with the Cloud Drive or Cloud Drive Uploader not starting because of missing files.
C:\Program Files (x86)\Nasuni Corporation\Nasuni Access Anywhere
Less commonly you may also need to exclude the virtual drive or drives you have configured:
S:\
Antivirus & Other Software
In general the Cloud Drive should perform as expected after install and restart. There are some types of software that could interfere with the Drive that IT Admins and users should be aware of.
The Cloud Drive application should be excluded from Anti Virus scanning to avoid performance and functionality issues. In particular there have been known issues in using the drive with Trend Micro Anti Virus scanning solution.
Note that in the past the firewall rules were added on install but Microsoft has added Tamper Protection in version 19.03 of Windows 10 which if turned on prevents this behaviour and any exemptions need to be made manually.
There may be other security software that could also have an effect, particularly software that may block the https request / response requests that the Drive makes to update call / update its directory listing or to upload / download files. Cylance is one such application that has been discovered that can block the Drive https requests that should be checked and if necessarily configured to exempt the Drive.
Additionally where a Company user Proxy servers to speed up / monitor / filter end user traffic https request / response result headers can be filtered or tampered with that can cause an issue with the Drive operations.
Silent Install
For rollouts to many users it is possible to do a silent install by specifying either the /SILENT or /VERYSILENT argument. This instructs Setup to be silent or very silent.
When Setup is silent the wizard and the background window are not displayed but the installation progress window is. When a setup is very silent this installation progress window is not displayed.
If a restart is necessary and the '/NORESTART' command isn't used and Setup is silent, it will display a Reboot now? message box. If it's very silent it will reboot without asking.
The installer supports the /NOCLOSEAPPLICATIONS parameter, in order to not close applications in silent mode.
The /RESTARTEXITCODE=3010 parameter can be passed to the installer, to return 3010 (as with an MSI installer) to indicate that the system needs to be restarted following a successful installation. Please note that installer may return 8 when the install could not proceed as a restart is needed after a previous install.
Post Install
After installation the latest version of the Apps reside in a Program group called 'Nasuni Access Anywhere' (if you are using an older version they may reside in a program group called 'Access Anywhere' or 'NAA Cloud Tools').
You can uninstall the tools from here or directly from the Windows Control Panel.
First Login
You can enter your username and password for login directly in the Nasuni Access Anywhere Control Panel. There are also options for secure access and whether to remember your login details.
Change the application endpoint to your Nasuni Access Anywhere Server.
Desktop integration
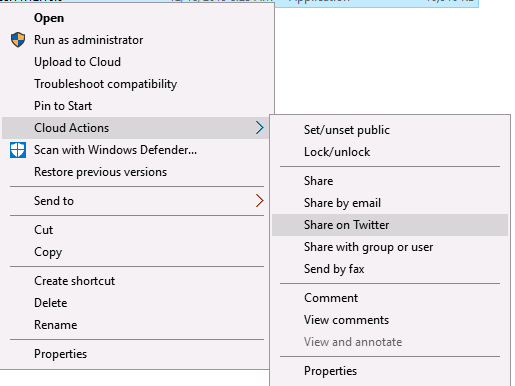
The desktop integration options are reasonably self explanatory. The context menu options enable integration with the Windows shell on right click on files when in the Cloud Drive (in the Windows stock file explorer).
There is an additional shell option available for desktop files called 'upload' which enables users to upload files from desktop directories without have to navigate to the Cloud Drive.
Which Virtual Drive ?
There are actually 2 drive technologies that exist that can be used with Access Anywhere. Choosing which you want to use is going to be dependent on the needs of of your Organization. Lets look at the differences between the 2:
Installable Cloud Drive: You can assign this drive a drive letter and you can access it even via DOS at the command line. It also features a cloud cache that caches files locally and polls the cloud for updates. You can double click files to edit and save them back to the Cloud.
DrawBacks: It required a physical install so if you require a zero install client you should use the CloudDAV / WebDAV zero install drive.
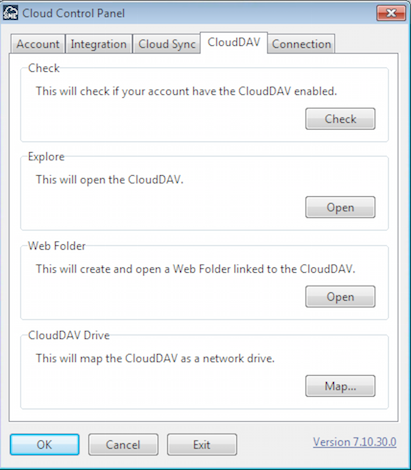
**CloudDAV Drive: ** CloudDAV is actually a universal WebDAV layer that Access Anywhere adds over all providers to an account to enable them to be accessed from WebDAV. Windows supports using WebDAV as a drive. Access Anywhere makes this easy by just clicking the 'Map' button in the Access Anywhere control panel.
Disadvantages: Due to the way WebDAV works on Windows it can be a little slower than the physical install drive outlined above as the WebDAV protocol is quite chatty.
Advantages: WebDAV is firewall friendly. Windows has built in support for WebDAV, and if Internet Information Server is being used (IIS) then file locking over SMB shares is honored by the drive.
WebDAV client programs, especially Windows clients, often require tuning of their configurations to work as expected with WebDAV servers such as CloudDAV. The configuration requirements vary depending on the client software as well as the operating system version and sometimes other factors. For more information, please contact Nasuni Support.
Network Cloud drive
You can assign the Nasuni Access Anywhere network drive a drive letter and you can access it even via DOS at the command line. It also features a cloud cache that caches files locally and polls the cloud for updates. You can double click files to edit and save them back to the Cloud.
To enable the network drive: 1. Right click on the drive in the Windows control Panel and choose settings. 2. From the settings page login.
Select your drive letter and choose to Mount the drive.
The Drive can be launched from a Desktop icon. The Desktop icon launches with the Setting's pane. If you wish for the Drive to be only launched into the Tray, adjust the shortcut by adding the '/tray' flag.
Uninstalling
In the Program Files folder where the application is installed, there is a file "unins001.exe" that will uninstall the application.
The uninstaller program accepts optional command line parameters:
/SILENT, /VERYSILENT When specified, the uninstaller will not ask the user for startup confirmation or display a message stating that uninstall is complete. Shared files that are no longer in use are deleted automatically without prompting. Any critical error messages will still be shown on the screen. When '/VERYSILENT' is specified, the uninstallation progress window is not displayed.
If a restart is necessary and the '/NORESTART' command isn't used (see below) and '/VERYSILENT' is specified, the uninstaller will reboot without asking.
/SUPPRESSMSGBOXES Instructs the uninstaller to suppress message boxes. Only has an effect when combined with '/SILENT' and '/VERYSILENT'.
/LOG Causes Uninstall to create a log file in the user's TEMP directory detailing file uninstallation and [UninstallRun] actions taken during the uninstallation process. This can be a helpful debugging aid.
The log file is created with a unique name based on the current date. (It will not overwrite or append to existing files.)
The information contained in the log file is technical in nature and therefore not intended to be understandable by end users. Nor is it designed to be machine-parsable; the format of the file is subject to change without notice.
/LOG="filename" Same as /LOG, except it allows you to specify a fixed path/filename to use for the log file. If a file with the specified name already exists it will be overwritten. If the file cannot be created, Uninstall will abort with an error message.
/NORESTART Instructs the uninstaller not to reboot even if it's necessary.